No4 Mk1 cracked stock at recoil area |
Post Reply 
|
Page 12> |
| Author | |
micrometer 
Newbie 
Joined: December 26 2023 Location: Rocky Mtn, USA Status: Offline Points: 18 |
 Post Options Post Options
") Thanks(0) Thanks(0)
 Quote Reply Quote Reply
 Topic: No4 Mk1 cracked stock at recoil area Topic: No4 Mk1 cracked stock at recoil areaPosted: December 26 2023 at 2:33pm |
|
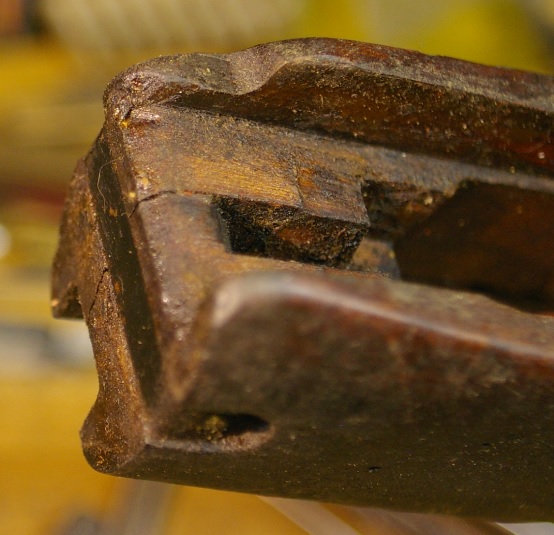
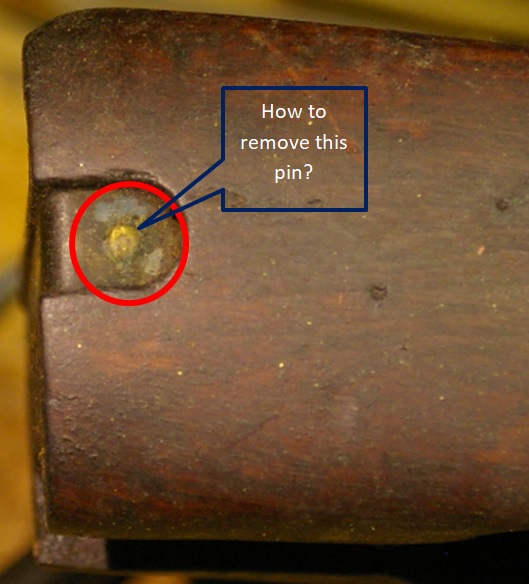
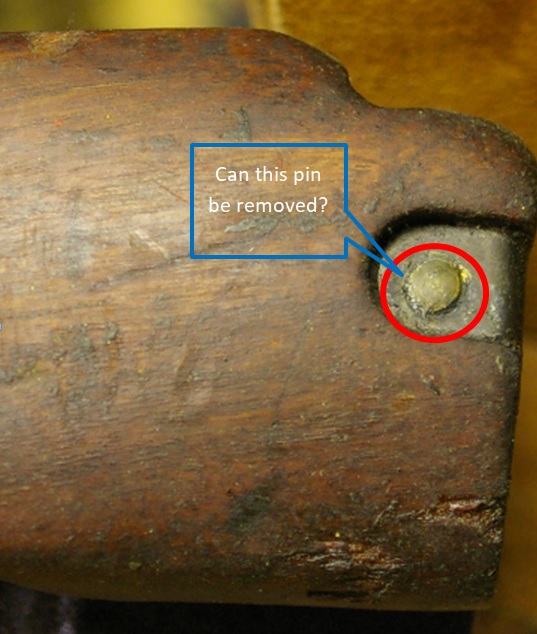
I have a crack in the stock right above the trigger guard that I'd like to repair. It appears that I'd have to remove the metal bar that runs across so I can get access to the crack. The bar has a pin in it.
How do I remove this metal bar so I can get access to the cracked wood? Thanks for any suggestions, Mike
     |
|
 |
|
|
A square 10
Special Member 

Donating Member Joined: December 12 2006 Location: MN , USA Status: Offline Points: 16999 |
Post Options
Thanks(0)
Quote Reply
Posted: December 27 2023 at 6:28pm |
|
welcome to the site , there are others here that have more experience with these repairs than i do so ill wait to let them respond , ive never attempted what your asking about ,
|
|
|
|
|
Shamu
Admin Group

Logo Designer / Donating Member Joined: April 25 2007 Location: MD, USA. Status: Offline Points: 20510 |
Post Options
Thanks(0)
Quote Reply
Posted: December 27 2023 at 6:54pm |
|
Its a single long rivet that passes through the stock. You could carefully grind the head off & pull push or drive it out. Places like E-bay frequently have the strap & rivet as replacements.
|
|
|
Don't shoot till you see the whites of their thighs. (Unofficial motto of the Royal Air Force)
|
|
|
|
|
micrometer
Newbie
Joined: December 26 2023 Location: Rocky Mtn, USA Status: Offline Points: 18 |
Post Options
Thanks(0)
Quote Reply
Posted: December 27 2023 at 7:45pm |
|
Thanks A Square and Shamu for your replies.
I'll keep an eye out for the replacements on ebay, sarco, numerich... If this crack is left unrepaired would it be harmful for the rifle to be fired? I've not ever fired it. I'm not sure how critical this crack is to the operation of the rifle. It's not like this is a crack to the recoil lug area of other bolt rifles. Again thanks for any responses, Mike
|
|
|
|
|
A square 10
Special Member
Donating Member Joined: December 12 2006 Location: MN , USA Status: Offline Points: 16999 |
Post Options
Thanks(0)
Quote Reply
Posted: December 27 2023 at 10:52pm |
|
are you certain you cannot repair it without removal of the rivet and band ? there are epoxies that might flow into that crack if you look at it critically there may be a way , i would try anything short of disassembly of the original bits in this case , but it is a late RFI so i would not suggest what you intend will compromise collector value at this point ,
|
|
|
|
|
britrifles
Senior Member 

Joined: February 03 2018 Location: Georgia, USA Status: Offline Points: 8404 |
Post Options
Thanks(0)
Quote Reply
Posted: December 28 2023 at 4:09am |
|
If it was my rifle, I’d fix this if I intended to shoot the rifle.
Can you slide the forend forward/backward on the barreled action without trigger guard installed?
|
|
|
|
|
Doco Overboard
Senior Member
Joined: January 26 2020 Location: USA Status: Offline Points: 279 |
Post Options
Thanks(0)
Quote Reply
Posted: December 28 2023 at 4:43am |
|
Sometimes that pin is really just a small wire nail. What you want to do is carefully grind the ends until you can get the strap off. Then pull, rather that drive the nail out becuase they're not very really strong. Once you have that done, wash the stock out thoroughly with a solvent, then drill lengthwise through the old nail hole transversely and epoxy a wooded dowel in its place. Using the epoxy in the crack itself and clamp together until its all set. Afterwards, once your clamp is removed, make the ends of the dowel off with a sharp chisel and drill for a 1/8'' brass pin. Be careful drilling your new hole, becuase it has to me the other side of the tie plate just right. Also fashion your pin so that its slightly peened on one side and just the right length before inserting it. You want just enough to emerge from the other side to capture the tie plate and have enough remaining to peen that end over slightly. When you fit the pin to the the plate before assembling, and you drill straight, you'll notice that if the ends of the plate are slightly compressed inwards, Thats what creates tension on the pin and helps keep it walking to and fro. You can glue/epoxy the pin in place as well if you choose. On the nails, if that's what has been used they're very soft and easy to form a dome on the end. A brass alloyed pin not so much so heat it up significantly while doing your fitting so it's a bit softer.
|
|
|
|
|
micrometer
Newbie
Joined: December 26 2023 Location: Rocky Mtn, USA Status: Offline Points: 18 |
Post Options
Thanks(0)
Quote Reply
Posted: December 28 2023 at 10:08am |
|
So here is my proposed fix, 1. Carefully dremel off the small end of the brass pin so I can drive it out. 2. Remove the strap. 3. Repair the crack with Titebond III. 4. Replace the strap. 5. Cut the pin a little bit shorter from the cut off end. a. Replace the original pin (epoxy) to its original position.. b. Fashion a new brass pin domed (peened) over. Cut its length to fit into the shortened hole. 6. Epoxy it in place for a cosmetic fix. What do you think? |
|
|
|
|
Shamu
Admin Group
Logo Designer / Donating Member Joined: April 25 2007 Location: MD, USA. Status: Offline Points: 20510 |
Post Options
Thanks(0)
Quote Reply
Posted: December 28 2023 at 12:15pm |
|
Yes, it would be harmful to fire unimpaired. that area of the wood is a major player in recoil absorption. The only things I'd do different is to clean the wood down inside the crack so it will bond with the glue. Once you get the strap & rivet out GENTLY spread the crack A LITTLE. now dribble spray or pour some denatured alcohol in & let it run out & evaporate. this will drive oils away from the surface allowing for a better bond. I'd replace the pin in Toto. Its designed to pull the wood together & reinforce it against recoil. Your cosmetic fix won't do that.
|
|
|
Don't shoot till you see the whites of their thighs. (Unofficial motto of the Royal Air Force)
|
|
|
|
|
Doco Overboard
Senior Member
Joined: January 26 2020 Location: USA Status: Offline Points: 279 |
Post Options
Thanks(0)
Quote Reply
Posted: December 28 2023 at 3:51pm |
|
You could also remove the tie plate, wash the wood out with acetone or other solvent, Mix up tite bond with some water. Blow it into the crack with some compressed air. Apply more glue and clamp tightly. But thats not worth the effort without inserting a wood dowel through the pin/nail hole and either gluing or bonding it in place. Then clamping. That's where the strength in the repair is going to come from. The dowel. When you drill through the dowel, only the exterior will remain dependent on the size of the pin. Just like in the picture. If you make the end of the dowel off flush to the in letting and just a little more, when the pin is inserted and the rounded ends of the tie plate are squeezed together, they will capture the new pin like a spring and the pin will not have to be peened over. A good way to get a nail or pin out is to heat it while pulling with pliers and it will burn itself tension free of the wood.   In order to drill nice and straight and your lucky enough to have a drill press with a vise or even a clamp.Drive a nail into a square block of wood and adjust the press table to where the chucked wood bit meets the clamped block and pointed nail squarely. Plumb your stock in between the bit and on the nail where you want the bit to meet after marking the holes so the stock is true to level and the horizontal and check with a small square to the rear of the stock on the press table and bore the hole right on through. When you squeeze the tie together, its grabbed onto the pin almost permanently. Your only peening the ends for good measure and appearance and to prevent vibration. Softening the pin is helpful depending how hard it has been made. |
|
|
|
|
Shamu
Admin Group
Logo Designer / Donating Member Joined: April 25 2007 Location: MD, USA. Status: Offline Points: 20510 |
Post Options
Thanks(0)
Quote Reply
Posted: December 28 2023 at 6:18pm |
|
^^^ This.
|
|
|
Don't shoot till you see the whites of their thighs. (Unofficial motto of the Royal Air Force)
|
|
|
|
|
micrometer
Newbie
Joined: December 26 2023 Location: Rocky Mtn, USA Status: Offline Points: 18 |
Post Options
Thanks(0)
Quote Reply
Posted: December 29 2023 at 10:39am |
|
Thanks for all of the great solutions you have offered! I’m very familiar with Mauser actions where the main recoil
impulse is absorbed at the recoil lug near the front action screw. I’ve bedded
many actions at this location. The SMLE seems reverse engineered where the recoil impulse
is located at the rear end of the front stock. It appears to me that the main
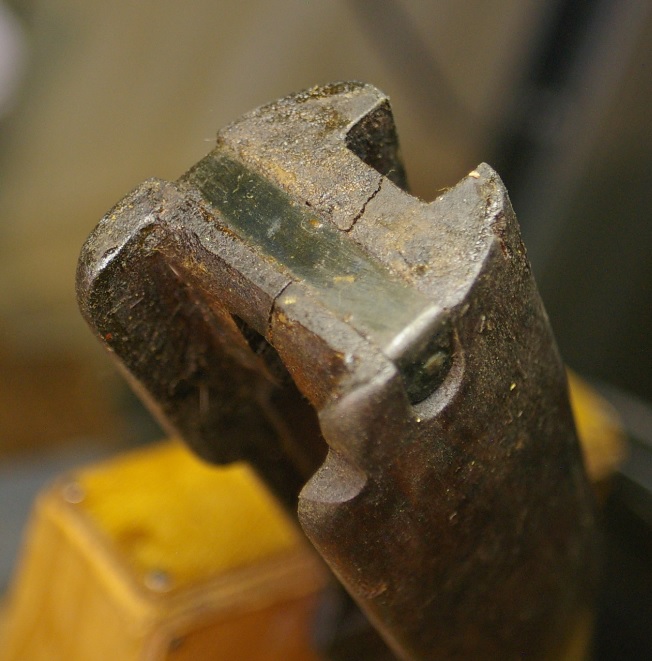
recoil is absorbed at the location I’ve highlighted in the attached photo. If
this is true, then I understand that this is where most of the recoil is
located. I can formulate a fix based on this fact. So Doco’s solution says the
dowel will be the main area where the recoil is absorbed. This dowel is critical for a viable solution for this fix. Thanks for any responses, Mike |
|
|
|
|
Zed
Special Member

Donating Member Joined: May 01 2012 Location: France Status: Offline Points: 6460 |
Post Options
Thanks(0)
Quote Reply
Posted: December 29 2023 at 12:13pm |
|
The main recoil should be on the "draws" which are the two internal shoulders . These are just visible on the right side of your photo.
The receiver recoil lugs drop into these and should be a snug fit.
|
|
|
It's nice to be important, but it's more important to be nice!
|
|
|
|
|
micrometer
Newbie
Joined: December 26 2023 Location: Rocky Mtn, USA Status: Offline Points: 18 |
Post Options
Thanks(0)
Quote Reply
Posted: December 29 2023 at 12:31pm |
So the key recoil areas would be these two locations; 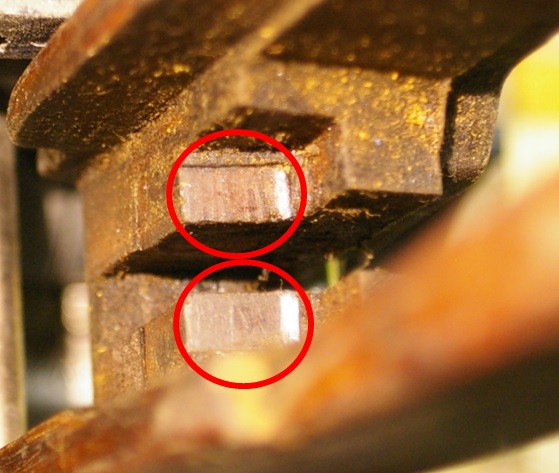 |
|
|
|
|
britrifles
Senior Member
Joined: February 03 2018 Location: Georgia, USA Status: Offline Points: 8404 |
Post Options
Thanks(0)
Quote Reply
Posted: December 29 2023 at 12:44pm |
|
Yes, ideally, the back surface of the forend and the draws bearing surfaces form a wedge that prevents the forend from sliding forward and backwards on the action. Sling tension pulls the forend back onto the front face of the butt socket while the draws take the forend “forward” movement from recoil.
That’s why I asked the question of the forend can move front to back on the action with the trigger guard removed.
|
|
|
|
|
micrometer
Newbie
Joined: December 26 2023 Location: Rocky Mtn, USA Status: Offline Points: 18 |
Post Options
Thanks(0)
Quote Reply
Posted: December 29 2023 at 12:47pm |
The barreled action has no forward/backward movement in the stock. This would eliminate this movement as the cause of this crack in the first place. If it were the cause then epoxy bedding of the barreled action would be warranted. Thanks, Mike
|
|
|
|
|
Post Reply
|
Page 12> |
| Tweet |
| Forum Jump | Forum Permissions You cannot post new topics in this forum You cannot reply to topics in this forum You cannot delete your posts in this forum You cannot edit your posts in this forum You cannot create polls in this forum You cannot vote in polls in this forum |


 Topic Options
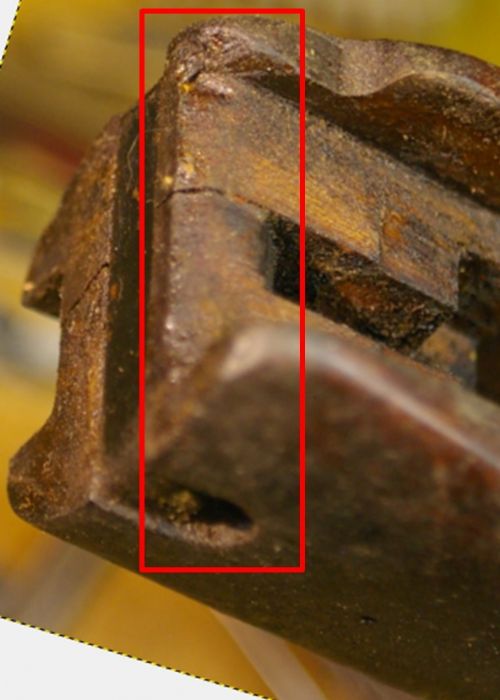
 Zed wrote: