No.4 Mk1* action bushing/loose forestock |
Post Reply 
|
Page <1234 5> |
| Author | |
slowindown 
Senior Member 
Joined: January 16 2024 Location: MS, USA Status: Offline Points: 108 |
 Post Options Post Options
") Thanks(0) Thanks(0)
 Quote Reply Quote Reply
 Posted: January 21 2024 at 6:41am Posted: January 21 2024 at 6:41am |
|
Fore end
  |
|
 |
|
|
shiloh
Senior Member

Joined: January 08 2019 Location: Ontario, Canada Status: Offline Points: 3049 |
Post Options
Thanks(0)
Quote Reply
Posted: January 21 2024 at 7:05am |
|
Looks like Birch
|
|
|
|
|
britrifles
Senior Member

Joined: February 03 2018 Location: Georgia, USA Status: Offline Points: 8404 |
Post Options
Thanks(0)
Quote Reply
Posted: January 21 2024 at 8:20am |
|
Yes, stained birch is my guess…
|
|
|
|
|
slowindown
Senior Member
Joined: January 16 2024 Location: MS, USA Status: Offline Points: 108 |
Post Options
Thanks(0)
Quote Reply
Posted: January 21 2024 at 8:46am |
|
Thanks. That is what I was thinking but I wasn’t sure.
Back to the loose barrel/action situation. Removing .01+ seems to have worked nicely to tighten the action. Now to address the minimal pressure on the barrel, do the places I’ve colored red in the picture below show where the shims should go? Also, how do you attach the shim to the wood? I assume there are no issues shooting it as it is now? Thanks for the help.  |
|
|
|
|
Shamu
Admin Group 

Logo Designer / Donating Member Joined: April 25 2007 Location: MD, USA. Status: Offline Points: 20510 |
Post Options
Thanks(0)
Quote Reply
Posted: January 21 2024 at 12:31pm |
|
Minor point. if you use Linseed to swell shrunken, dried wood you are better off with RAW linseed oil because it penetrates much deeper over time swelling better. BLO dries pretty much overnight & won't do that as much. I see no problem shooting it, the recessed area that takes recoil shot is the 2 cutouts & you haven't touched those. A little shorter, as shown here, in the drawing, but basically yes. Ignore the screws & plates that's a sneaky Aussie trick  for Lithy SMLE's. for Lithy SMLE's. |
|
|
Don't shoot till you see the whites of their thighs. (Unofficial motto of the Royal Air Force)
|
|
|
|
|
britrifles
Senior Member
Joined: February 03 2018 Location: Georgia, USA Status: Offline Points: 8404 |
Post Options
Thanks(0)
Quote Reply
Posted: January 21 2024 at 1:44pm |
|
Yes, those red areas is where you want to add the shims. They should stay in place without glue to test fire. If all works well, you can epoxy in place. I have a set of shims made up for fine tuning, 0.005, .010, .015, .020, .025. Aluminum or brass works fine.
|
|
|
|
|
slowindown
Senior Member
Joined: January 16 2024 Location: MS, USA Status: Offline Points: 108 |
Post Options
Thanks(0)
Quote Reply
Posted: January 21 2024 at 2:01pm |
|
Thank you so much, gentlemen. You have been a great help to me in understanding the workings of this rifle. I will put the knowledge you've shared to good use. Unfortunately, unless I get lucky with work things I've scheduled, I won't get to it until next weekend.
|
|
|
|
|
slowindown
Senior Member
Joined: January 16 2024 Location: MS, USA Status: Offline Points: 108 |
Post Options
Thanks(0)
Quote Reply
Posted: January 25 2024 at 6:53am |
I've gotten through most of my extra work I had scheduled so I'm hoping to start with this tonight. It occurred to me that a feeler gauge would be a good source of shims and they have them at harbor freight for $5 so I may pick up one or two later. https://www.harborfreight.com/feeler-gauge-32-piece-63665.html I'll probably put a scope on it and check how it groups without shimming and then with, hopefully Saturday.
|
|
|
|
|
Shamu
Admin Group
Logo Designer / Donating Member Joined: April 25 2007 Location: MD, USA. Status: Offline Points: 20510 |
Post Options
Thanks(1)
Quote Reply
Posted: January 25 2024 at 1:21pm |
|
Good idea.
|
|
|
Don't shoot till you see the whites of their thighs. (Unofficial motto of the Royal Air Force)
|
|
|
|
|
slowindown
Senior Member
Joined: January 16 2024 Location: MS, USA Status: Offline Points: 108 |
Post Options
Thanks(0)
Quote Reply
Posted: January 27 2024 at 5:43am |
|
Couple of pictures below…
So, I cut and shaped these two shims out of two .010 (.25mm) feeler gauge blades. The do seem to have put more pressure on the front fore end bearing (if that’s the right term). Flipping the rifle upside down in a rest and hooking a fish scale to it and looking/feeling the best I can, I think that it’s pulling free from that bearing between 4 and 4.5 lbs. It’s pretty hard to tell and could be anywhere between 2.5 and 5. Or, who knows, I could be way off base. I put a cheap scope on it to test fire but I probably need to wait for my wife to wake up as my 100 yard range is off my back porch  I need to run to town for epoxy anyway as mine is pretty much dried out. I need to run to town for epoxy anyway as mine is pretty much dried out. Do these look to be correct and what we were talking about? 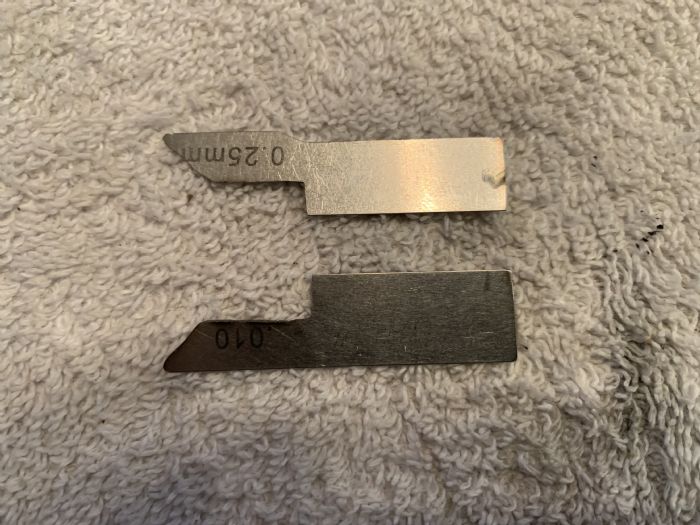 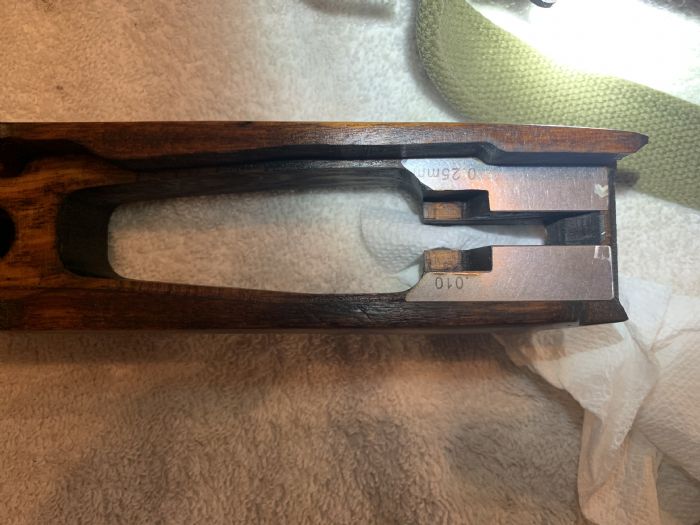 |
|
|
|
|
Zed
Special Member

Donating Member Joined: May 01 2012 Location: France Status: Offline Points: 6460 |
Post Options
Thanks(0)
Quote Reply
Posted: January 27 2024 at 8:23am |
|
If you slide a strip of paper between the barrel and the wood at the muzzle end. Pull the spring balance and note what weight the paper is released.
|
|
|
It's nice to be important, but it's more important to be nice!
|
|
|
|
|
britrifles
Senior Member
Joined: February 03 2018 Location: Georgia, USA Status: Offline Points: 8404 |
Post Options
Thanks(1)
Quote Reply
Posted: January 27 2024 at 8:59am |
|
Also, the rifle should only be supported on the action body and butt stock, don’t hold onto the forend.
Here’s how I set up mine. I use .003 inch thick aluminum shim stock between barrel and forend bearing, note the reading on the scale as you gently pull the shim stock until it slips.
 |
|
|
|
|
A square 10
Special Member

Donating Member Joined: December 12 2006 Location: MN , USA Status: Offline Points: 16998 |
Post Options
Thanks(0)
Quote Reply
Posted: January 27 2024 at 9:30am |
|
very interesting and informative thread ,
|
|
|
|
|
slowindown
Senior Member
Joined: January 16 2024 Location: MS, USA Status: Offline Points: 108 |
Post Options
Thanks(0)
Quote Reply
Posted: January 27 2024 at 10:21am |
|
I put a cheap 3-9x32 simmons scope on it. I temporarily attached the cheek piece with some velcro as I'm unlikely to run a scope on this rifle and didn't want to drill holes in it. Anyway, I'm very happy with the groupings at 100 yards. So I guess I just need to epoxy my shims down? I ran into another weird sort of problem. The top wood pieces slowly creep forward. I find myself loosening the barrel bands every 4-5 shots and sliding them back before it makes it to the sight. What's a good way to fix this? 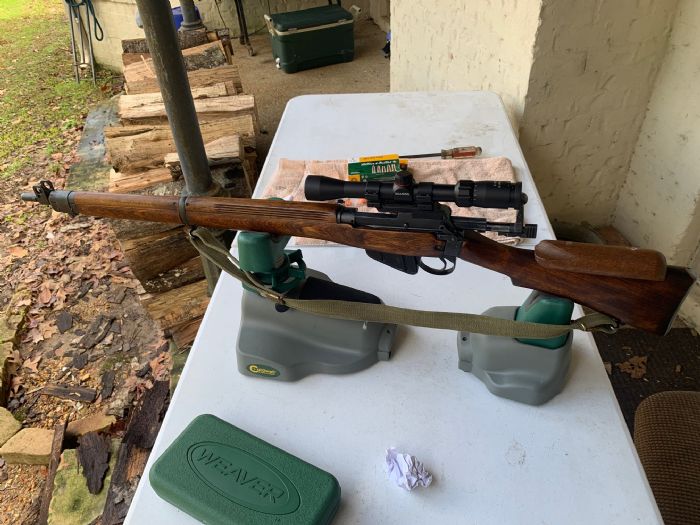  |
|
|
|
|
britrifles
Senior Member
Joined: February 03 2018 Location: Georgia, USA Status: Offline Points: 8404 |
Post Options
Thanks(0)
Quote Reply
Posted: January 27 2024 at 12:31pm |
|
Yes, use a flat screwdriver to stake the back edge of the upper band which engages in the handguard cap.
 |
|
|
|
|
slowindown
Senior Member
Joined: January 16 2024 Location: MS, USA Status: Offline Points: 108 |
Post Options
Thanks(0)
Quote Reply
Posted: January 27 2024 at 12:45pm |
|
Thank you!
|
|
|
|
|
Post Reply
|
Page <1234 5> |
| Tweet |
| Forum Jump | Forum Permissions You cannot post new topics in this forum You cannot reply to topics in this forum You cannot delete your posts in this forum You cannot edit your posts in this forum You cannot create polls in this forum You cannot vote in polls in this forum |


 Topic Options
 slowindown wrote: