Oil Blackening. |
Post Reply 
|
| Author | |
Shamu 
Admin Group 

Logo Designer / Donating Member Joined: April 25 2007 Location: MD, USA. Status: Offline Points: 20510 |
 Post Options Post Options
") Thanks(0) Thanks(0)
 Quote Reply Quote Reply
 Topic: Oil Blackening. Topic: Oil Blackening.Posted: November 12 2023 at 2:45pm |
|
Well after reading many accounts of doing it, I decided to take the plunge. The biggest problem was figuring out HOW to do it! Reading them all revealed 2 things. Firstly, no one seems to have the same materials, times or temperatures as any one else! Temps varied from 350℉ to "Red Hot". Times varied from "a minute or two" to "not less than 10 minutes". Oils varied from "(must be) Old dirty engine oil", (for the higher carbon content), through "anything you want, even cooking oil will do". Then there were the cautions about "Flaming oil fires" when quenching, And the need for a bath containing the oil & a bigger one to cover it immediately after insertion to kill flare ups. Well I got the old toaster oven fired up & a cleaned cat food tin for the oil bath & a metal coffee can for the fire extinguisher. (I'm learning on small parts like Chicago Screws & sling metal hardware) The real actual "ABC" fire extinguisher just a couple of feet away just in case.  Started with old cooking oil & 350℉ for 8 minutes using the timer on the toaster oven. The item being treated, a sling swivel, in a small foil pan, so I can retrieve it from the oven transport it the 6" to the oil bath & drop it in without anything cold contacting it (a Major no-no). Meh, pretty much nothing, minimal, if any color change no flaming oil just a visible convection disturbance in the used cooking oil. Checking the indicated 350℉ on the oven with an infrared thermometer I know & trust it was way way too cold, more like 275℉. Cranked it to "400" & repeated Also extending the time to 10 minutes so it could "soak" in the heat. A little more convection in the oil & a very slight almost invisible "straw" color. Actual item temp was up to 325℉ Went to the top time temperature setting on the oven 450℉ for 15 minutes. Better still! the actual temp was 420℉ OK set it to "Toast" (top & bottom heating element come on now, previously it was only the bottom one.) There is no longer a "temp" setting the elements just cone on & "pulse a little" Better, a distinct darkening of the metal & more convection, but still not enough. Temp read 450℉. RIGHTY HO Then! "break the wire" & "Go Buster"!  Max heat, no time setting just on, full blast top & bottom & time with the stopwatch for 10 minutes. 460℉ *that's all it can give me* but I'm not really wanting to go higher in cases I change the metal's temper. YESS! A clear flowing of heated oil away from the metal & a pretty much instant color change to a deep purple color! I repeated it as several write ups suggested more than one cycle being needed for the depth of color required. That was pretty much what I was trying to learn & the metal sling swivel loop has a nice darker, less purple color that seems to have some depth to it! No noxious smoke & no "flaming oil" either, the whole covering it instantly thing seems to be a myth. Maybe when I go to bigger parts? (like an SMLE Nose cap I have my eye on)!  |
|
|
Don't shoot till you see the whites of their thighs. (Unofficial motto of the Royal Air Force)
|
|
 |
|
|
A square 10
Special Member

Donating Member Joined: December 12 2006 Location: MN , USA Status: Offline Points: 16999 |
Post Options
Thanks(0)
Quote Reply
Posted: November 12 2023 at 2:58pm |
|
i like the look of this finish ,
|
|
|
|
|
Sapper740
Senior Member 

Joined: July 15 2021 Location: Texas Status: Offline Points: 1737 |
Post Options
Thanks(0)
Quote Reply
Posted: November 13 2023 at 3:15am |
|
I love stories like this of "gettin' 'er done!" with what you have on hand. It's been a long time since Metal Shop in high school where we were taught about the use of oil quenching to temper the metal. Of course, oil blackening is a different process. I've been told after cold bluing with Birchwood Casey products to leave the cold blued part in oil overnight to fix the color and prevent any missed area from rusting.
|
|
|
|
|
Shamu
Admin Group
Logo Designer / Donating Member Joined: April 25 2007 Location: MD, USA. Status: Offline Points: 20510 |
Post Options
Thanks(0)
Quote Reply
Posted: November 13 2023 at 11:08am |
|
I've never left them in it, but I do wipe the cold blue with a oily rag. That removes the loose crud & seems to set the color pretty well. |
|
|
Don't shoot till you see the whites of their thighs. (Unofficial motto of the Royal Air Force)
|
|
|
|
|
Zed
Special Member

Donating Member Joined: May 01 2012 Location: France Status: Offline Points: 6460 |
Post Options
Thanks(0)
Quote Reply
Posted: November 16 2023 at 1:21pm |
|
We used to blue steel in our school metalwork class (this was in the 70's). The oil bath was full of old engine oil; it was about 18" by 24" and 6"deep, (with 4" of oil). Luckily, it had a big metal lid hinged on the rear. We would heat the steel to just red; then drop it into the oil. (get it orange and it will flame easily). A colleague being ready to drop the lid to snuff out the flames. But the quantity of smoke was deadly. They would not let you have that much fun in school these days! We were casting aluminium as well in our final year.
We also learnt basic lathe and milling operation as well. The lathes were lined up alongside the windows; so at the start of every term; the new students would inevitably start the lathe with a key in the chuck; and fling it through a window. We'd have plywood in half of them before the end of term!
|
|
|
It's nice to be important, but it's more important to be nice!
|
|
|
|
|
Shamu
Admin Group
Logo Designer / Donating Member Joined: April 25 2007 Location: MD, USA. Status: Offline Points: 20510 |
Post Options
Thanks(0)
Quote Reply
Posted: November 16 2023 at 4:27pm |
|
OK Dull red. How much change (if any) does that give to the temper of things like screws? This is about as hot as I can get with the toaster oven, maybe a little more with a longer heat soak & maybe a pre-heat too? I have propane torch for more if I need it but I was liking the idea of very even heat all round the item being treated. 500°F to 1200°F is a big change! This scale seems right though as at 460 I'm getting a purple/brown color. Finished color by temperature  Indicated temp by color when heating  |
|
|
Don't shoot till you see the whites of their thighs. (Unofficial motto of the Royal Air Force)
|
|
|
|
|
Zed
Special Member
Donating Member Joined: May 01 2012 Location: France Status: Offline Points: 6460 |
Post Options
Thanks(0)
Quote Reply
Posted: November 17 2023 at 4:17am |
|
The heat/ colour table is useful.
Don't do it in the kitchen! You can turn your barbecue into a forge by blowing air with a hair dryer style fan or compressor. Good for large parts. Not sure what the change in hardness would be with oil quenching. |
|
|
It's nice to be important, but it's more important to be nice!
|
|
|
|
|
Shamu
Admin Group
Logo Designer / Donating Member Joined: April 25 2007 Location: MD, USA. Status: Offline Points: 20510 |
Post Options
Thanks(0)
Quote Reply
Posted: November 17 2023 at 11:28am |
|
I have a screened in porch where I usually do such things. (I'd be a dead man if I did that in the kitchen)! The Weber kettles actually have a forced air accessory for things like Pizza cooking.
 |
|
|
Don't shoot till you see the whites of their thighs. (Unofficial motto of the Royal Air Force)
|
|
|
|
|
Mayhem
Senior Member
Joined: February 06 2016 Location: Australia Status: Offline Points: 335 |
Post Options
Thanks(0)
Quote Reply
Posted: January 06 2024 at 8:06pm |
|
Personally I have found that if I get it red I end up with a poor finish that eventually rubs off, as the oil is bubbling too much at the surface of the metal to adhere well.
I now just give enough heat to see a faint change and have had much better results since. Dirty oil will give you a black finish where as clean oil supposedly gives you a purplish colour but I haven't tried this. I use a hand-held butane torch, so I know I'm unlikely to get too much heat in the part. I 'recondition' rusty charger clips this was as well.
|
|
|
.303 - Helping Englishmen express their feelings since 1889
|
|
|
|
|
Shamu
Admin Group
Logo Designer / Donating Member Joined: April 25 2007 Location: MD, USA. Status: Offline Points: 20510 |
Post Options
Thanks(0)
Quote Reply
Posted: January 07 2024 at 12:56pm |
|
Thanks! I can confirm the purple cast at 350℉ having done it myself on some sling swivels. I used a dedicated toaster oven with a 5 minute "heat soak" after reaching temp. Oil was cooking oil!
|
|
|
Don't shoot till you see the whites of their thighs. (Unofficial motto of the Royal Air Force)
|
|
|
|
|
Mayhem
Senior Member
Joined: February 06 2016 Location: Australia Status: Offline Points: 335 |
Post Options
Thanks(0)
Quote Reply
Posted: January 07 2024 at 3:48pm |
|
Good to know. Any pictures to share? I bet the cooking oil smells better that old diesel sump oil, although more likely to make me hungry!
|
|
|
.303 - Helping Englishmen express their feelings since 1889
|
|
|
|
|
Shamu
Admin Group
Logo Designer / Donating Member Joined: April 25 2007 Location: MD, USA. Status: Offline Points: 20510 |
Post Options
Thanks(0)
Quote Reply
Posted: January 07 2024 at 6:28pm |
|
I swear I had some, but can't find them. I'll take a couple more tomorrow. |
|
|
Don't shoot till you see the whites of their thighs. (Unofficial motto of the Royal Air Force)
|
|
|
|
|
Shamu
Admin Group
Logo Designer / Donating Member Joined: April 25 2007 Location: MD, USA. Status: Offline Points: 20510 |
Post Options
Thanks(1)
Quote Reply
Posted: January 10 2024 at 12:26pm |
|
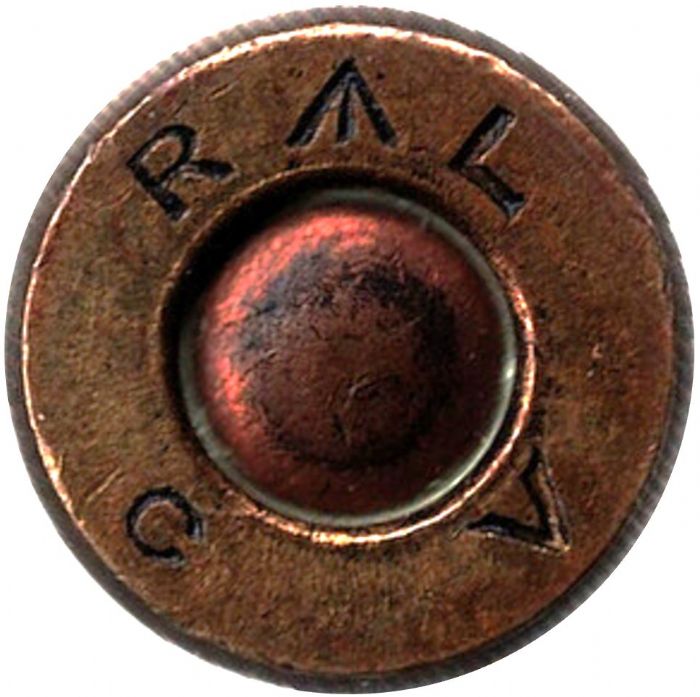
OK as promised just a little late. "Barney" purple sling swivel loops, This was a 10 minute heat soak @ 350 & drop in cooking oil. 
|
|
|
Don't shoot till you see the whites of their thighs. (Unofficial motto of the Royal Air Force)
|
|
|
|
|
mattri
Groupie 
Joined: December 25 2023 Location: iowa Status: Offline Points: 61 |
Post Options
Thanks(0)
Quote Reply
Posted: January 10 2024 at 5:42pm |
|
Very interesting write up, thanks.
|
|
|
|
|
smerdon42
Senior Member
Joined: February 20 2018 Location: Natick MA Status: Offline Points: 483 |
Post Options
Thanks(0)
Quote Reply
Posted: January 11 2024 at 12:49am |
|
Barney purple lol a little hotter and dirty oil will make em blacker
|
|
|
|
|
Sapper740
Senior Member
Joined: July 15 2021 Location: Texas Status: Offline Points: 1737 |
Post Options
Thanks(0)
Quote Reply
Posted: January 11 2024 at 4:50am |
|
An interesting aside about oil blackening: Norway is excavating a buried Viking Longboat dating from 850-950 AD at Gjellestad. The wooden timbers and ribs have completely rotted away but they can tell the size and shape of the boat from the layout of the iron nails. The iron nails were oil blackened which allowed them to survive over a millenia buried in the soil.
|
|
|
|
|
Post Reply
|
|
| Tweet |
| Forum Jump | Forum Permissions You cannot post new topics in this forum You cannot reply to topics in this forum You cannot delete your posts in this forum You cannot edit your posts in this forum You cannot create polls in this forum You cannot vote in polls in this forum |


 Topic Options