Long Branch 69L Mk 1/3 gets a new Barrel |
Post Reply 
|
Page 123 7> |
| Author | |
britrifles 
Senior Member 

Joined: February 03 2018 Location: Georgia, USA Status: Offline Points: 8404 |
 Post Options Post Options
") Thanks(0) Thanks(0)
 Quote Reply Quote Reply
 Topic: Long Branch 69L Mk 1/3 gets a new Barrel Topic: Long Branch 69L Mk 1/3 gets a new BarrelPosted: January 02 2024 at 12:23pm |
|
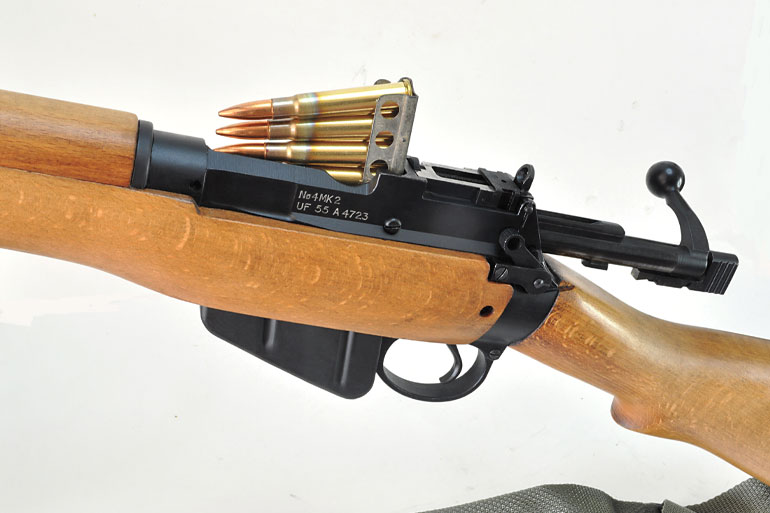
After thinking on this for a few years now, I finally decided it was time to replace the BSA barrel on the 1944 69Lxxxx Long Branch. This barrel was installed by Fulton’s in 1963 on a match prepped (Fulton Regulated) rifle for U.K. NRA SR(b) shooting. The rifle belonged to a friend of my Dads, who never fired it. Dad had not fired it either. I got the rifle almost 30 years ago and I learned to shoot with it.
About 10,000 rounds thru the barrel, I wished I had kept a barrel log. It was a very good shooter indeed. But groups had opened up from the 1 to 1.5 MOA range to 3 to 4 MOA and no longer would hold the 10 ring on the US NRA Short Range target. Gone were the days I could put ten consecutive shots into the X ring at 200 yds shooting prone with the standard Mk 1 aperture sight. I purchased a Criterion barrel several years back with intentions of using it on this rifle when the barrel went. Last Friday shooting it at the range convinced me it was time. BSA barrel removed this morning. This one came off fairly easily. I use a 3 foot steel pipe extension on the action body wrench. Did not have to use heat on this one, nor cut the barrel reinforce either to relieve the compression on the shoulder.  Cleaned the action body in the ultrasonic cleaner, solution was black when it finished. Took out years of crud. The new Criterion barrel, a 5 groove LH twist, .3025 bore. 174 gr SMK contacts lands at 3.098 OAL with Hornady OAL gage. The thinnest breeching up washer (.037 thick) gives 14 deg barrel under turn. 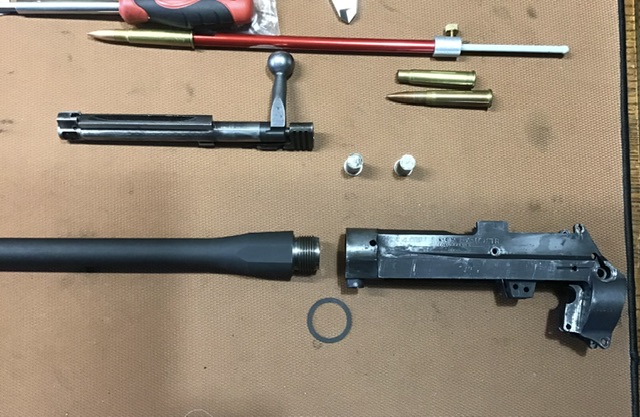 It’s ready to install. Hand tight headspace looks good. Here is the bolt position with the .070 No-Go gage and the #1 bolt head that was on the bolt.  Still have to finish ream the chamber, but it’s pretty close as it is, just a very light cut until the reamer just contacts the back face of the breach. Headspace and cartridge base to ogive measurements retaken with 174 SMK after finish ream and barrel install. |
|
 |
|
|
britrifles
Senior Member
Joined: February 03 2018 Location: Georgia, USA Status: Offline Points: 8404 |
Post Options
Thanks(0)
Quote Reply
Posted: January 02 2024 at 1:30pm |
|
First issue noted, the groove in the top of the barrel for the front sight block pin is not machined into the Criterion barrel. Will probably have to file this with a 3/32 dia file. Can’t see any other way to do it, any other suggestions?
 |
|
|
|
|
Doco Overboard
Senior Member
Joined: January 26 2020 Location: USA Status: Offline Points: 279 |
Post Options
Thanks(0)
Quote Reply
Posted: January 02 2024 at 1:33pm |
|
I'm curious as to what brand of finish reamer you have. I have a Clymer and the pilot's not even close to fitting the bore of two new SMLE barrels I have. I used it on a no 4 barrel that I repurposed for a project rifle and now I have to get it ground before finishing the others up.
|
|
|
|
|
britrifles
Senior Member
Joined: February 03 2018 Location: Georgia, USA Status: Offline Points: 8404 |
Post Options
Thanks(0)
Quote Reply
Posted: January 02 2024 at 2:11pm |
|
It’s a Manson reamer. The pilot is .3021 diameter as measured and they are interchangeable. The .302 was a bit snug, but at least it’s not sloppy.
|
|
|
|
|
DarioPirovano
Senior Member
Joined: May 20 2023 Location: Italy Status: Offline Points: 219 |
Post Options
Thanks(0)
Quote Reply
Posted: January 02 2024 at 3:16pm |
First of all, thank you for this high quality content Geoff. I would probably do this way: Set the sight base in position and lock it with loctite contact glue, then, with a lot of care and attention, I would place the barrel in the drill press and with a drill bit of the correct size, then cut… to do a “gross” centering of the drill press and the hole, place the drill bit in the opposite way in the chuck and regulate the vise it until it moves freely in the hole. I’ll be honest with you, with the fear of messing everything up I would chose the rounded file too, that will give the best control on the situation.. Would you like to show us some other images and some more explanation on how to rebarrel the no.4? |
|
|
|
|
britrifles
Senior Member
Joined: February 03 2018 Location: Georgia, USA Status: Offline Points: 8404 |
Post Options
Thanks(0)
Quote Reply
Posted: January 02 2024 at 3:47pm |
|
Thanks Dario, I think I will go with the 3/32 inch diameter round file, just take a bit at a time until the tapered pin fits just right. I’m afraid of breaking off a drill bit trying to drill the notch, or buggering up the sight block as the bit will want to slip on the barrel trying to drill a notch tangent to the surface. I wonder how this was done at the factory, perhaps the hole in the block was drilled when it was attached to the barrel.
I’ll post more photos once I install the barrel. I finished reamed the chamber this afternoon. I did this with the barrel off the action. This always makes me nervous, as you can mess up the throat this way. I borescoped it afterwards and it looks good. Hopefully I did not bugger it up. The biggest problem I have had is getting the old barrel off. These barrels are on tight. Finding a workable action wrench and barrel vice took me a while. The set I have seems to work, but it required a lot of sanding to get the tapered aluminum barrel vice bushing to fit the chamber reinforce. Despite being advertised as a Lee Enfield action wrench and barrel vice, the fit to the chamber reinforce was all wrong giving only a line contact. I ended up wrapping an old barrel I had with sandpaper around the reinforce and chucking it in the drill press. Then holding the bushing down over the sandpaper to get the right taper. Even then, the barrel wants to spin in the vice, you have to put a lot of torque on the two bolts that clamp on to the barrel. One thing I don’t really like about the action wrench is that it relies on clamping forces as well, and it clamps right on the forward part of the action body over the threaded area. This must be squeezing the body down onto the barrel threads, which just makes it harder to turn. I wish I had drawings of the original action wrenches and barrel vice. I thought about sending the barreled action off to Brian d**k to separate for me but I decided I didn’t want to put it in the mail. It’s much easier installing the barrel. The Criterion barrel comes with a set of breeching washers of four thicknesses in increments of .001 inch. The thinnest one seems to be the right one giving a 14 deg barrel under turn before applying any torque. The next size gave about 20 deg which I think is excessive. My measurements of under turn are fairly approximate using an adjustable protractor held on the knocks form flat and movable arm held vertical to the body. I probably won’t get anymore work done on it until Thursday. |
|
|
|
|
DarioPirovano
Senior Member
Joined: May 20 2023 Location: Italy Status: Offline Points: 219 |
Post Options
Thanks(0)
Quote Reply
Posted: January 02 2024 at 4:19pm |
|
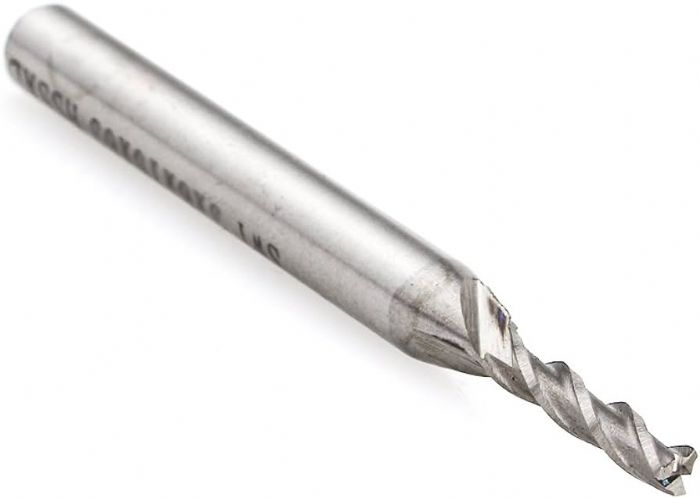
I believe they used some kind of a cylindrical mill similarl to this one
 Inside a harder steel jig. At their time, key slotting machines and this kind of machining process was very popular and probably the most cheap and easy machine to get, I think it was probably the fastest way to cut maybe 10 barrels groove at a time Ill’wait for any update!! |
|
|
|
|
Shamu
Admin Group 

Logo Designer / Donating Member Joined: April 25 2007 Location: MD, USA. Status: Offline Points: 20510 |
Post Options
Thanks(0)
Quote Reply
Posted: January 02 2024 at 4:21pm |
|
High speed, low feed & lots of oil?
 |
|
|
Don't shoot till you see the whites of their thighs. (Unofficial motto of the Royal Air Force)
|
|
|
|
|
britrifles
Senior Member
Joined: February 03 2018 Location: Georgia, USA Status: Offline Points: 8404 |
Post Options
Thanks(0)
Quote Reply
Posted: January 02 2024 at 4:30pm |
|
I thought about trying an end mill to cut the notch. Might try that first. Seems Criterion missed this little detail.
|
|
|
|
|
Doco Overboard
Senior Member
Joined: January 26 2020 Location: USA Status: Offline Points: 279 |
Post Options
Thanks(0)
Quote Reply
Posted: January 02 2024 at 4:32pm |
|
What Ive done in the past, is mark each side of the block onto the barrel with a #2 or grease pencil and carefully file but using a small triangular file. Ive also used a hacksaw when doing pinning and carefully on other systems opening up the cut with needle files. Like one would do when making a dovetail. If its done this way, the edge of the cut can be peened over to tighten up on the pin if necessary. A trick associated with using a hacksaw blade is to grind one side of the teeth off. That way you can control the width of the cut and keep the cut straight. This is a good method for fixing buggered screw heads that are just peened over and dressed off nice and smooth again. As for how it was done originally I always assumed it was done primarily by hand fitting on initial assembly. The reason for my thinking is, sometimes when swapping barrels stocks and what have you, the block for the sight will interfere with the front of the stock and the sheet-metal bands that reinforce it. Often theirs not much room to work there if the original slot has been cut because of the diameter of the pin and how distorted they become. For this reason I would assemble the fore-end to make sure the block is positioned correctly. Every once in a while one will need moved front a touch. The good news is, the lugs on the barrel will keep the block straight and keep it from wiggling left and right when you file. Just make adequate clearance to the stock is available. I use the attached fore sight block (a clean machined one) to index the barrel with levels once its coming up to tight and then you can check it on a heavy piece of glass or a scrap of that ground granite they cut for counter tops by turning the barrel over to the block and the sight ears on the make do surface plate. Sometimes yo need to lever them a little bit to get them just so.
|
|
|
|
|
A square 10
Special Member

Donating Member Joined: December 12 2006 Location: MN , USA Status: Offline Points: 16998 |
Post Options
Thanks(0)
Quote Reply
Posted: January 02 2024 at 8:26pm |
|
ive only fitted a handguard/bayo boss to an 1897 shot gun but i did that same cut with the file - very slowly and methodically as i wanted the tightest fit and least amount of barrel damage , im not one to tell anyone how to gunsmith their firearm but sometimes i find the age old "hand work" is best
|
|
|
|
|
britrifles
Senior Member
Joined: February 03 2018 Location: Georgia, USA Status: Offline Points: 8404 |
Post Options
Thanks(0)
Quote Reply
Posted: January 04 2024 at 6:27am |
|
The breeching up operation is complete. Installing the barrel is much easier than removing one!
First, get the barrel leveled in the barrel vice. Unfortunately, can’t use the flat on the Knox Form as it is hidden under the vice bushing. I use a spirit level along the top of the front sight block band. 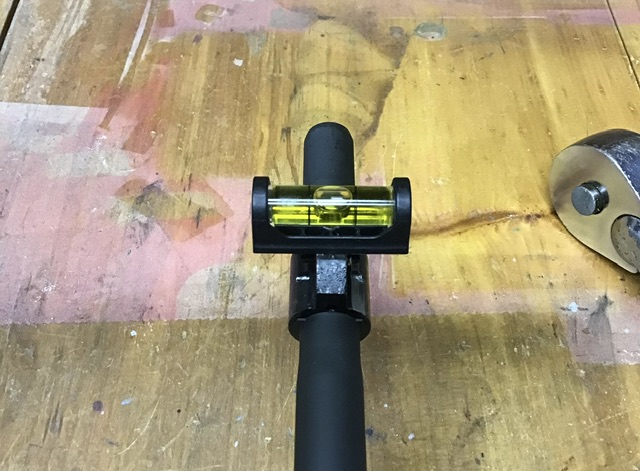 Barrel clamped up very snug, using a 2 foot ratchet and socket on the vice bolts. Powdered rosin on the reinforce and both surfaces of the aluminum bushing and the inside surface of the barrel vice. Anti-seize lubricant on the barrel threads. Action wrench aluminum bushing also dusted with powdered rosin and pushed over front threaded area of the body. 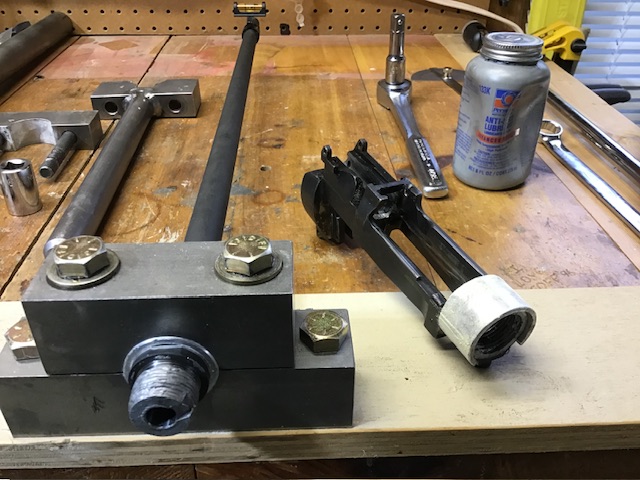 Measured the body under-turn at 15 degrees when snugged by hand. Reynolds stated 18 deg was the requirement, but during wartime production, this varied a lot. The next size up breeching washer would put the underturn at over 20 deg, so I used the thinnest washer, 0.037 inches thick. 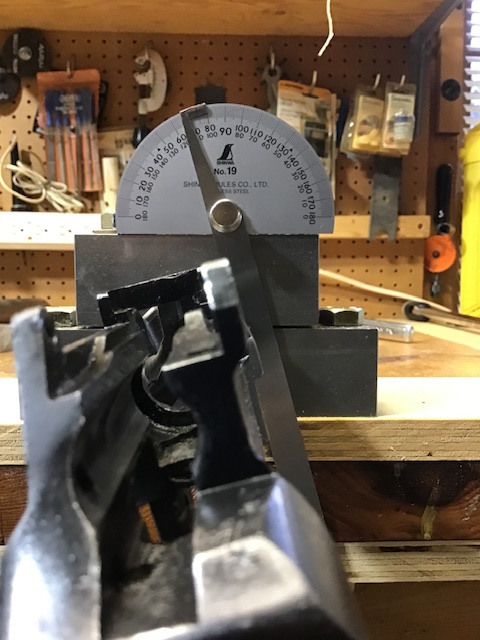 Action wrench fitted and bolts torqued, not as tight as barrel vice, not putting nearly the torque on the wrench to install the barrel as it took to remove it. 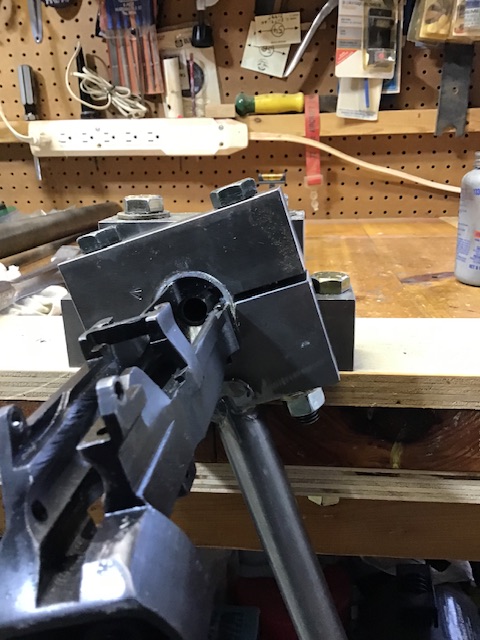 Torque action body to barrel until it is level with the front sight. I use a close fitting drill bit thru the back sight ears. The final tweak to align the body took about 100 foot lbs, an estimate, not using a torque wrench here. Had one foot up against the bench leg and gave it a good pull. 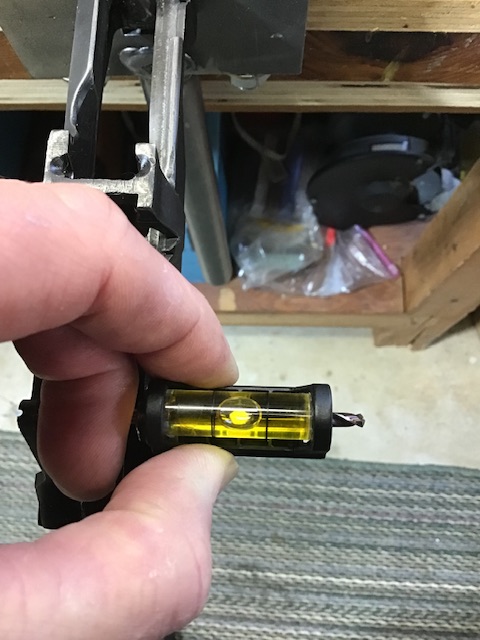 Action wrench and barreled action body removed from the barrel vice. You can see the two aluminum bushings here. 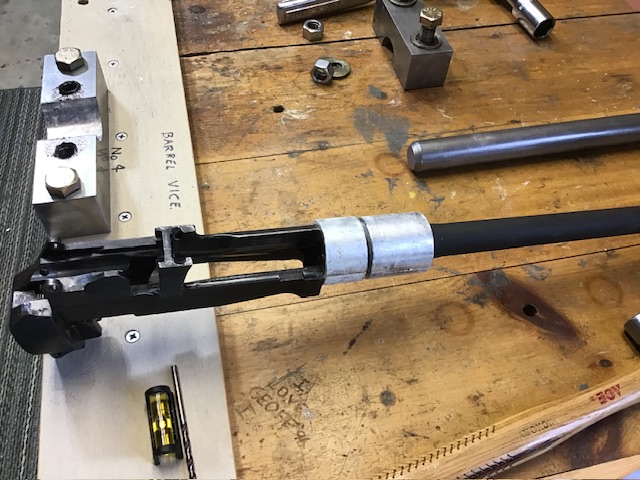 Headspace checked. With two layers of aluminum foil (.0013 thick total) the bolt just closes on the 0.064 GO gage, so headspace is a fraction over 0.065 inches with the same #1 bolt head, just where I want it. Bolt a long way off locking on the 0.070 NOGO gage. 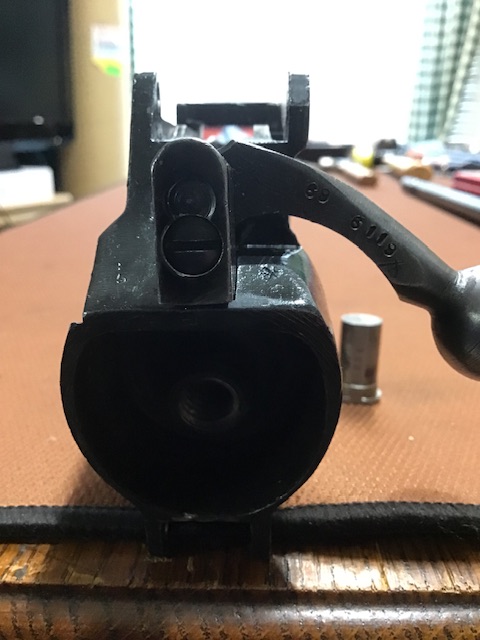 All done…  |
|
|
|
|
DarioPirovano
Senior Member
Joined: May 20 2023 Location: Italy Status: Offline Points: 219 |
Post Options
Thanks(0)
Quote Reply
Posted: January 04 2024 at 7:21am |
|
Awesome, congrats!!
How did you made the groove for the front sight base pin? Based on my mechanical comprehension, wouldn’t it be better to use the next size breeching washer? By turning more degrees, the torque is higher, and it provide a stiffer joint, that in my opinion makes the barrel more stiffer, so a higher frequency of barrel vibration, instead of a low frequency whip vibration What do you think? |
|
|
|
|
britrifles
Senior Member
Joined: February 03 2018 Location: Georgia, USA Status: Offline Points: 8404 |
Post Options
Thanks(0)
Quote Reply
Posted: January 04 2024 at 7:53am |
|
I’ve not put the groove in the barrel yet for the front sight block band retaining pin.
Torquing the barrel higher than I did makes it that much harder to remove. I don’t think I was anywhere near yielding any material, but with the next size washer, I might not get that barrel off. The barrel I removed had about the same underturn angle, and it was tough to get off, took about 80 lbs at a 4 foot lever arm (320 ftlbs). The last barrel I did had about 12 degrees underturn, and it shot well. Page 185 of Reynolds book states the No. 1 and No. 4 drawing requirement for the breeching up angle was 10 to 14 degrees. For some time, this angle was substantially lower for the No. 4 in practice. The issue was studied and the final desired angle was 18 deg which was to give a standard breeching “load” of 120 lbs +/- 5 lbs. I presume he meant foot pounds of torque and not pounds force, unless the load is associated with the specific tooling used. I concluded 15 degrees should be satisfactory. |
|
|
|
|
DarioPirovano
Senior Member
Joined: May 20 2023 Location: Italy Status: Offline Points: 219 |
Post Options
Thanks(0)
Quote Reply
Posted: January 04 2024 at 8:25am |
|
This makes sense, I didn’t thought about a possible need to remove the barrel.
I think too he meant ft/lbs of torque.. there aren’t any photos or drawings of “issued” tooling in the net? Maybe by asking fultons or some seasoned commonwealth club armourer we get the answer. I don’t know if fultons is going to answer any question, i wrote them many emails and never received answers…. |
|
|
|
|
DarioPirovano
Senior Member
Joined: May 20 2023 Location: Italy Status: Offline Points: 219 |
Post Options
Thanks(0)
Quote Reply
Posted: January 04 2024 at 8:27am |
|
Are you going to do a refresh of the bedding job or just leave it as it is?
|
|
|
|
|
Post Reply
|
Page 123 7> |
| Tweet |
| Forum Jump | Forum Permissions You cannot post new topics in this forum You cannot reply to topics in this forum You cannot delete your posts in this forum You cannot edit your posts in this forum You cannot create polls in this forum You cannot vote in polls in this forum |


 Topic Options
 britrifles wrote: