No4 Mk1 cracked stock at recoil area
Printed From: Enfield-Rifles.com
Category: Enfields
Forum Name: Enfield Gunsmithing
Forum Description: Submit any how-to's or other gunsmithing suggestions here.
URL: http://www.enfield-rifles.com/forum_posts.asp?TID=13062
Printed Date: March 26 2026 at 7:10pm
Software Version: Web Wiz Forums 12.07 - https://www.webwizforums.com
Topic: No4 Mk1 cracked stock at recoil area
Posted By: micrometer
Subject: No4 Mk1 cracked stock at recoil area
Date Posted: December 26 2023 at 2:33pm
|
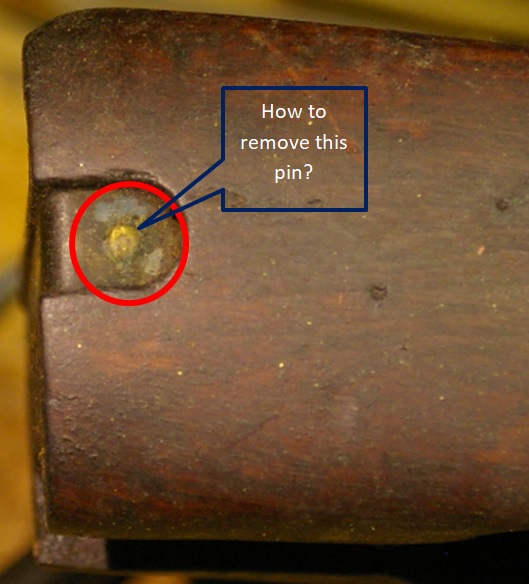
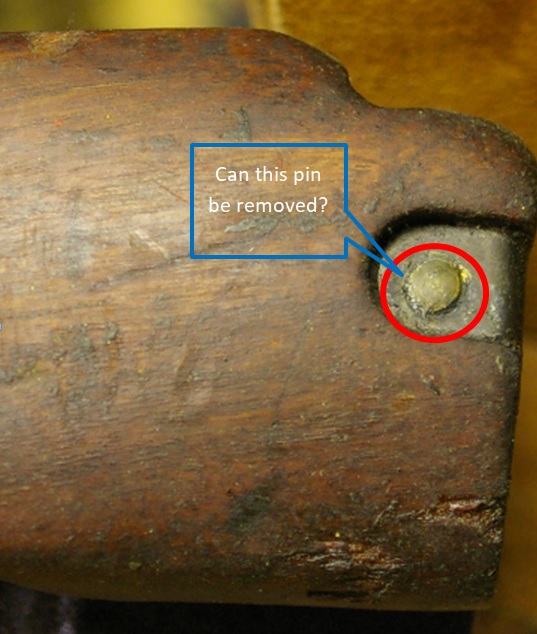
I have a crack in the stock right above the trigger guard that I'd like to repair. It appears that I'd have to remove the metal bar that runs across so I can get access to the crack. The bar has a pin in it. How do I remove this metal bar so I can get access to the cracked wood? Thanks for any suggestions, Mike
     |
Replies:
Posted By: A square 10
Date Posted: December 27 2023 at 6:28pm
| welcome to the site , there are others here that have more experience with these repairs than i do so ill wait to let them respond , ive never attempted what your asking about , |
Posted By: Shamu
Date Posted: December 27 2023 at 6:54pm
|
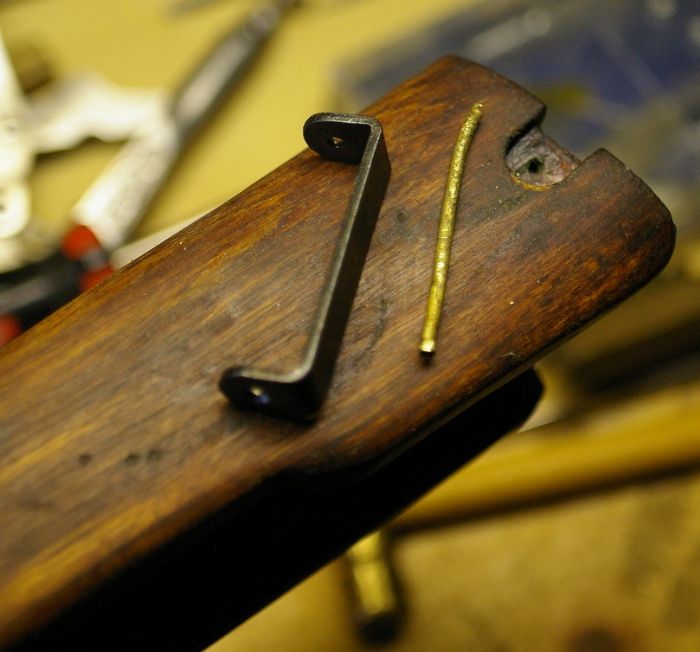
Its a single long rivet that passes through the stock. You could carefully grind the head off & pull push or drive it out. Places like E-bay frequently have the strap & rivet as replacements. ------------- Don't shoot till you see the whites of their thighs. (Unofficial motto of the Royal Air Force) |
Posted By: micrometer
Date Posted: December 27 2023 at 7:45pm
|
Thanks A Square and Shamu for your replies. I'll keep an eye out for the replacements on ebay, sarco, numerich... If this crack is left unrepaired would it be harmful for the rifle to be fired? I've not ever fired it. I'm not sure how critical this crack is to the operation of the rifle. It's not like this is a crack to the recoil lug area of other bolt rifles. Again thanks for any responses, Mike
|
Posted By: A square 10
Date Posted: December 27 2023 at 10:52pm
|
are you certain you cannot repair it without removal of the rivet and band ? there are epoxies that might flow into that crack if you look at it critically there may be a way , i would try anything short of disassembly of the original bits in this case , but it is a late RFI so i would not suggest what you intend will compromise collector value at this point , |
Posted By: britrifles
Date Posted: December 28 2023 at 4:09am
|
If it was my rifle, I’d fix this if I intended to shoot the rifle. Can you slide the forend forward/backward on the barreled action without trigger guard installed?
|
Posted By: Doco Overboard
Date Posted: December 28 2023 at 4:43am
|
Sometimes that pin is really just a small wire nail. What you want to do is carefully grind the ends until you can get the strap off. Then pull, rather that drive the nail out becuase they're not very really strong. Once you have that done, wash the stock out thoroughly with a solvent, then drill lengthwise through the old nail hole transversely and epoxy a wooded dowel in its place. Using the epoxy in the crack itself and clamp together until its all set. Afterwards, once your clamp is removed, make the ends of the dowel off with a sharp chisel and drill for a 1/8'' brass pin. Be careful drilling your new hole, becuase it has to me the other side of the tie plate just right. Also fashion your pin so that its slightly peened on one side and just the right length before inserting it. You want just enough to emerge from the other side to capture the tie plate and have enough remaining to peen that end over slightly. When you fit the pin to the the plate before assembling, and you drill straight, you'll notice that if the ends of the plate are slightly compressed inwards, Thats what creates tension on the pin and helps keep it walking to and fro. You can glue/epoxy the pin in place as well if you choose. On the nails, if that's what has been used they're very soft and easy to form a dome on the end. A brass alloyed pin not so much so heat it up significantly while doing your fitting so it's a bit softer.
|
Posted By: micrometer
Date Posted: December 28 2023 at 10:08am
|
So here is my proposed fix, 1. Carefully dremel off the small end of the brass pin so I can drive it out. 2. Remove the strap. 3. Repair the crack with Titebond III. 4. Replace the strap. 5. Cut the pin a little bit shorter from the cut off end. a. Replace the original pin (epoxy) to its original position.. b. Fashion a new brass pin domed (peened) over. Cut its length to fit into the shortened hole. 6. Epoxy it in place for a cosmetic fix. What do you think? |
Posted By: Shamu
Date Posted: December 28 2023 at 12:15pm
|
Yes, it would be harmful to fire unimpaired. that area of the wood is a major player in recoil absorption. The only things I'd do different is to clean the wood down inside the crack so it will bond with the glue. Once you get the strap & rivet out GENTLY spread the crack A LITTLE. now dribble spray or pour some denatured alcohol in & let it run out & evaporate. this will drive oils away from the surface allowing for a better bond. I'd replace the pin in Toto. Its designed to pull the wood together & reinforce it against recoil. Your cosmetic fix won't do that.
------------- Don't shoot till you see the whites of their thighs. (Unofficial motto of the Royal Air Force) |
Posted By: Doco Overboard
Date Posted: December 28 2023 at 3:51pm
|
You could also remove the tie plate, wash the wood out with acetone or other solvent, Mix up tite bond with some water. Blow it into the crack with some compressed air. Apply more glue and clamp tightly. But thats not worth the effort without inserting a wood dowel through the pin/nail hole and either gluing or bonding it in place. Then clamping. That's where the strength in the repair is going to come from. The dowel. When you drill through the dowel, only the exterior will remain dependent on the size of the pin. Just like in the picture. If you make the end of the dowel off flush to the in letting and just a little more, when the pin is inserted and the rounded ends of the tie plate are squeezed together, they will capture the new pin like a spring and the pin will not have to be peened over. A good way to get a nail or pin out is to heat it while pulling with pliers and it will burn itself tension free of the wood.   In order to drill nice and straight and your lucky enough to have a drill press with a vise or even a clamp.Drive a nail into a square block of wood and adjust the press table to where the chucked wood bit meets the clamped block and pointed nail squarely. Plumb your stock in between the bit and on the nail where you want the bit to meet after marking the holes so the stock is true to level and the horizontal and check with a small square to the rear of the stock on the press table and bore the hole right on through. When you squeeze the tie together, its grabbed onto the pin almost permanently. Your only peening the ends for good measure and appearance and to prevent vibration. Softening the pin is helpful depending how hard it has been made. |
Posted By: Shamu
Date Posted: December 28 2023 at 6:18pm
|
^^^ This. ------------- Don't shoot till you see the whites of their thighs. (Unofficial motto of the Royal Air Force) |
Posted By: micrometer
Date Posted: December 29 2023 at 10:39am
|
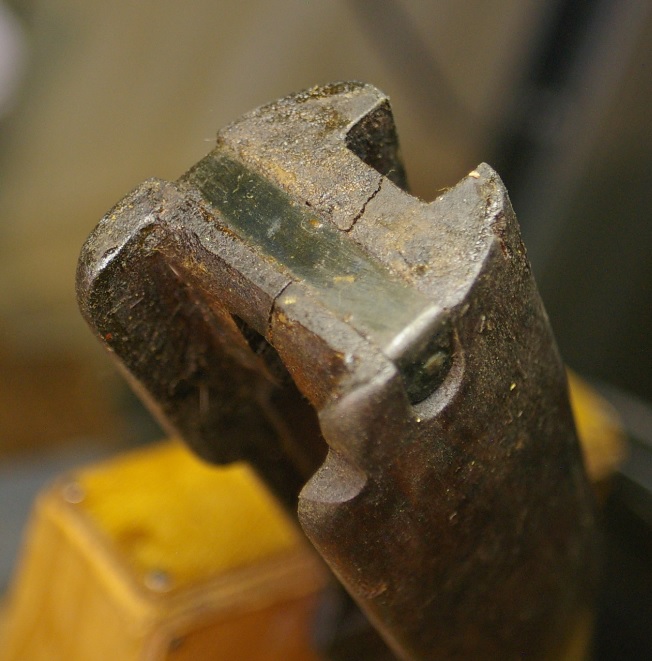
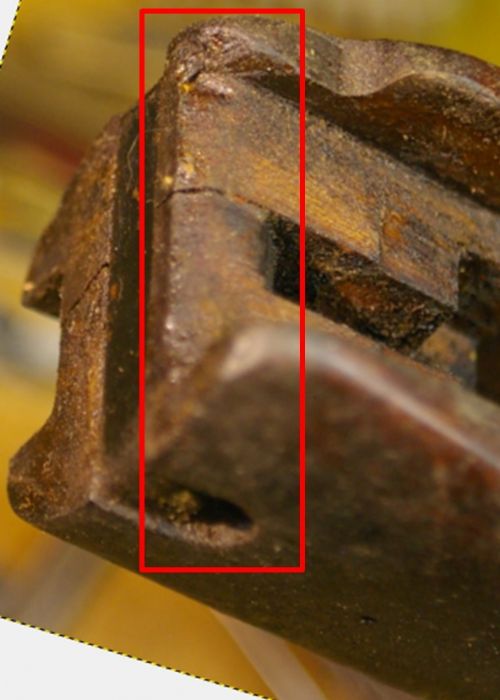
Thanks for all of the great solutions you have offered! I’m very familiar with Mauser actions where the main recoil
impulse is absorbed at the recoil lug near the front action screw. I’ve bedded
many actions at this location. The SMLE seems reverse engineered where the recoil impulse
is located at the rear end of the front stock. It appears to me that the main
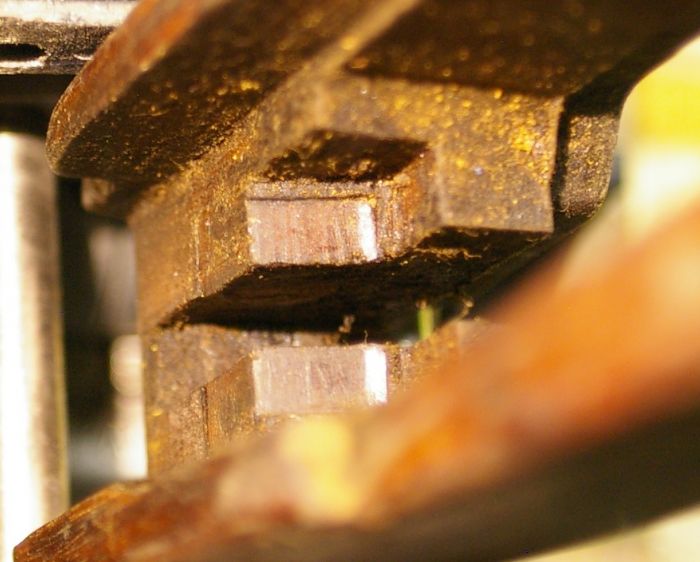
recoil is absorbed at the location I’ve highlighted in the attached photo. If
this is true, then I understand that this is where most of the recoil is
located. I can formulate a fix based on this fact. So Doco’s solution says the
dowel will be the main area where the recoil is absorbed. This dowel is critical for a viable solution for this fix. Thanks for any responses, Mike |
Posted By: Zed
Date Posted: December 29 2023 at 12:13pm
|
The main recoil should be on the "draws" which are the two internal shoulders . These are just visible on the right side of your photo. The receiver recoil lugs drop into these and should be a snug fit. ------------- It's nice to be important, but it's more important to be nice! |
Posted By: micrometer
Date Posted: December 29 2023 at 12:31pm
So the key recoil areas would be these two locations; 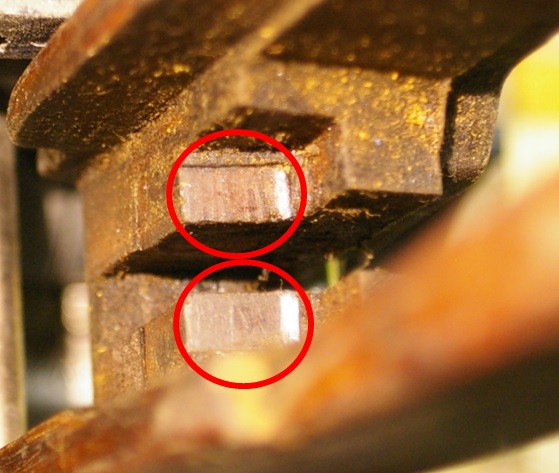 |
 Zed wrote:
Posted By: britrifles
Date Posted: December 29 2023 at 12:44pm
|
Yes, ideally, the back surface of the forend and the draws bearing surfaces form a wedge that prevents the forend from sliding forward and backwards on the action. Sling tension pulls the forend back onto the front face of the butt socket while the draws take the forend “forward” movement from recoil. That’s why I asked the question of the forend can move front to back on the action with the trigger guard removed.
|
Posted By: micrometer
Date Posted: December 29 2023 at 12:47pm
The barreled action has no forward/backward movement in the stock. This would eliminate this movement as the cause of this crack in the first place. If it were the cause then epoxy bedding of the barreled action would be warranted. Thanks, Mike
|
Posted By: micrometer
Date Posted: December 29 2023 at 4:59pm
Would a 304 stainless steel rod in place of the wooden dowel be a stronger fix?
|
Posted By: micrometer
Date Posted: December 29 2023 at 5:32pm
|
Thank you all for enlightening me on the repair of this cracked stock. I learned so much on this new to me SMLE no4 mk1. So here is my current proposed fix, 1. Carefully dremel off the small end of the brass pin so I can
drive it out. 2. Remove the strap. 3. Repair the crack with Titebond III. a. Slightly
spread open the crack. b. Clean it with alcohol.
Let it dry. c. Drizzle the
glue into the crack using compressed air until it’s full. d. Clamp the
stock until dried. 4. Measure the diameter of the brass pin. a. Use a slightly
larger diameter (1/8”) 304 stainless steel rod. b. Drill open the
wood hole to fit the steel rod. Also provides new wood for the epoxy adhesion. c. Drill open the
holes in the strap to allow the steel rod to pass through. d. Measure the
length of the steel rod to fit flush with the outsides of the strap. e. JB weld this
rod and strap into place using a clamp. f. Let it dry. 5. Peen a dome over the brass pin at the dremeled end. Cut off the
ends of the pin so only the domed ends remain. a. epoxy these in
place to preserve the original look. I hope this solution is useful for others that might need to do such a repair. I hope to give back a little for all the generous time experts donated. Regards, Mike
|
Posted By: Doco Overboard
Date Posted: December 29 2023 at 9:57pm
|
I'm looking at the picture supplied by the OP and the draws appear to have already been replaced. One of the pictures it even looks like the repair for the left lug is almost vertical at or near the top but the picture is not clear because of the view. The crack at the rear of the stock also seems to favor that side. Its hard to say, but I'm thinking it could be possible that the front of the repair may have suffered or the crack initially developed before the draws were replaced and just developed later on in service. At any rate, while its apart for repair would be a good time to go over all that sort of thing and get things squared up.
|
Posted By: micrometer
Date Posted: December 29 2023 at 11:03pm
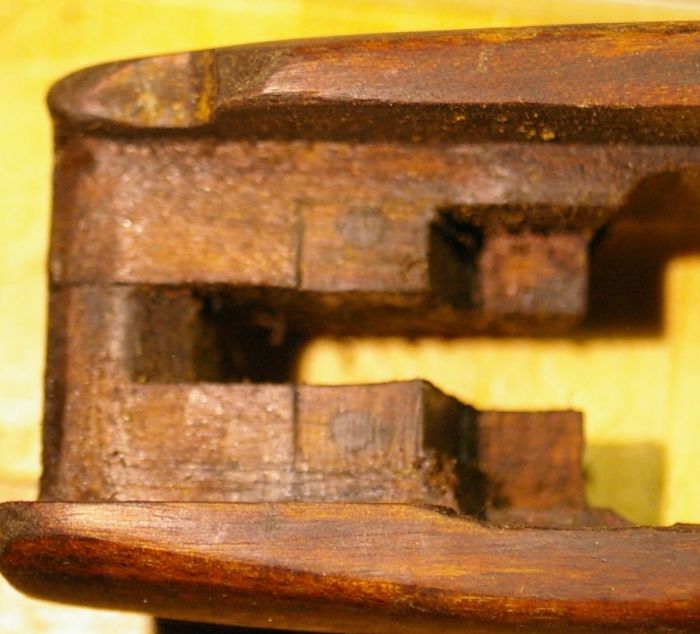 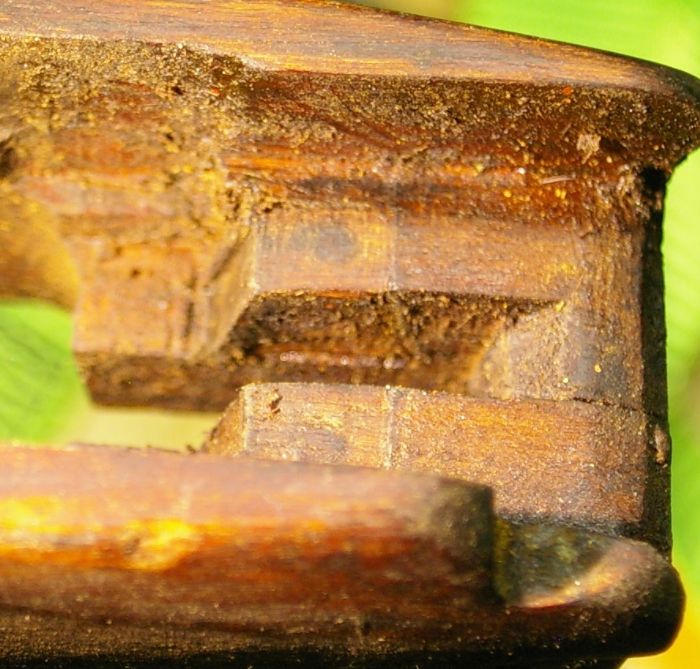 
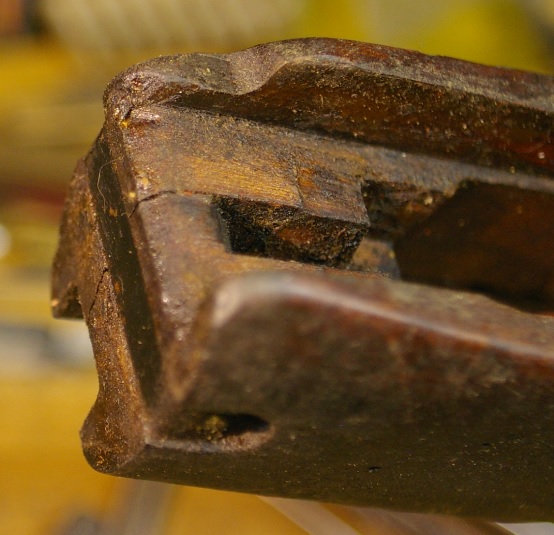
Here are additional photos. I don't know enough if this shows previous repair work done to the recoil area. If so, it appears to be done quite well. |
Posted By: Shamu
Date Posted: December 30 2023 at 1:54pm
|
Further forward. Where the little brass plates are fitted to this Lithgow rifle.  That's where the action actually is "drawn up" (hence the name) into the wood "camming" the rear faces of the receiver. & snugging everything down.  apologies for the slightly fuzzy image, its not mine I snagged it off the web. Its also why fully tightening the main screw is so critical. Of course the area between there & the stock rear is all critical as the wood can easily be stressed if not all fitting properly! I see the point about the draws, maybe being replaced, but I'm not sure if those are dowels holding in new wood, or hardwood dowels in the original wood as used for match bedding? Are there more towards the front of the action? One thing I would caution the OP about. NEVER "lever" the forend off, rotating the muzzle end away downwards! This should be done parallel to the bore all the way, the usual trick is a wood block & tap the rear off alternating left<>right, or with a jig that does both together. Big hunk of wood with two blunt "prongs" at one end.
 ------------- Don't shoot till you see the whites of their thighs. (Unofficial motto of the Royal Air Force) |
Posted By: micrometer
Date Posted: December 30 2023 at 2:43pm
Here's mine which now shows clearly there was a previous repair. 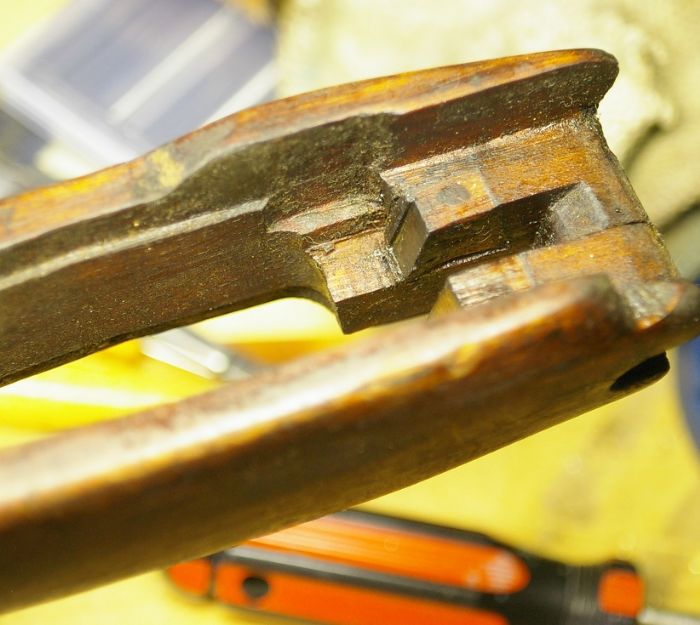 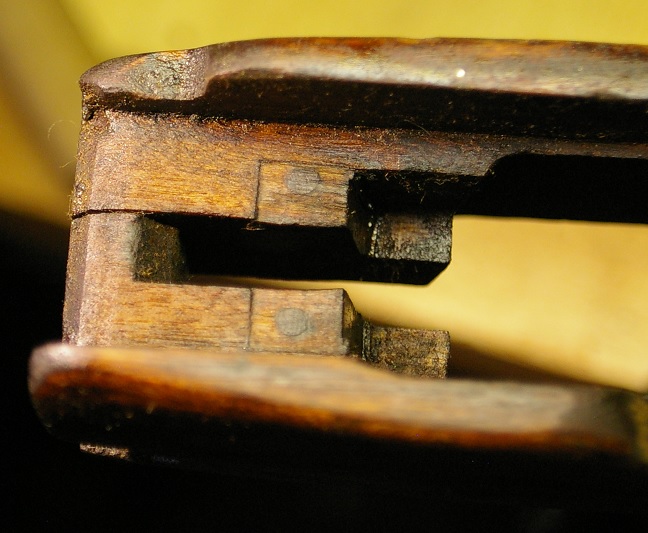 |
Posted By: britrifles
Date Posted: December 30 2023 at 3:48pm
|
^^^^ THIS!!!!! Can’t stress enough about how to removing the forend without damaging it. The draws on this OPs forend looks like they may have been crushed a bit by pulling the forend off the barreled action at the muzzle. The forend MUST be removed by using a wood block along the rear upper edges of the forend and tapping the wood block with a light hammer or mallet. NEVER pry the forend off from the muzzle end. This forend does look like a repair, wood inserted and secured with wood dowels. |
Posted By: micrometer
Date Posted: December 30 2023 at 7:04pm
| Thanks for the heads up! I was not aware of this major mistake waiting to happen to the uninformed. |
Posted By: Shamu
Date Posted: December 30 2023 at 7:34pm
|
No problem, it's one of the "Stupid Enfield Tricks" we're well known for. #1 is, of course "mad minute" #2 is catching the brass between your index & second fingers on ejection so you don't have to go "grubbing in the dert" for them  ------------- Don't shoot till you see the whites of their thighs. (Unofficial motto of the Royal Air Force) |
Posted By: A square 10
Date Posted: January 02 2024 at 9:00am
| good to get it fixed , looks great , |
Posted By: micrometer
Date Posted: January 03 2024 at 6:09pm
|
The repair is complete. 1. 1. Carefully
dremel off the small end of the brass pin so I can drive it out. 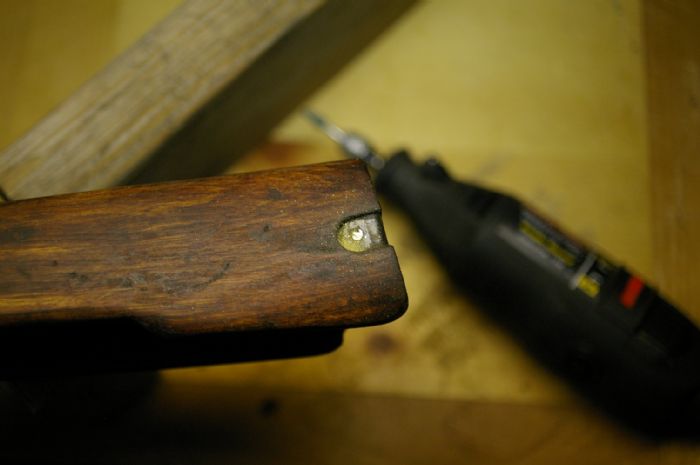 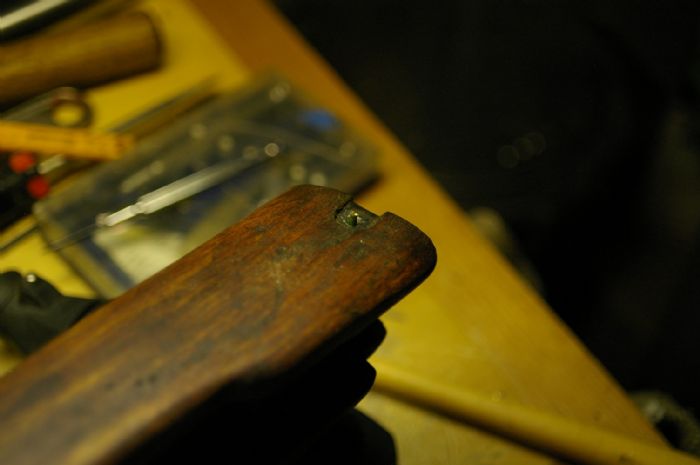 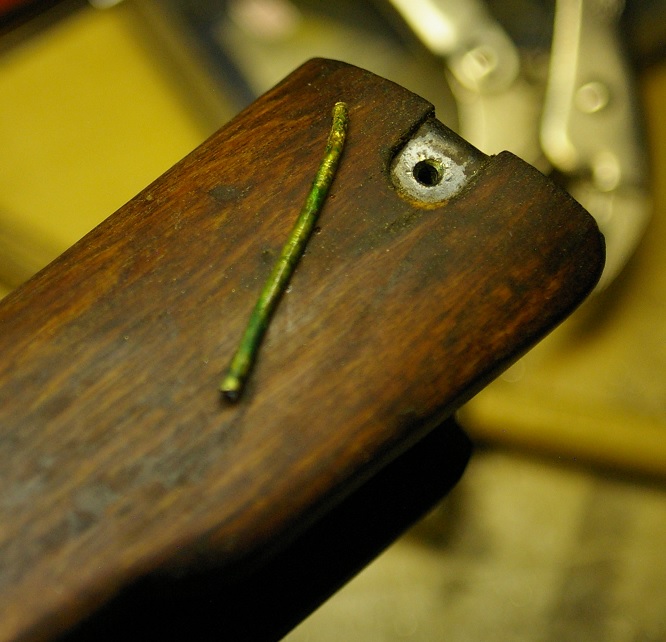 2. Remove the strap.
3. Repair the crack with
Titebond III. a.
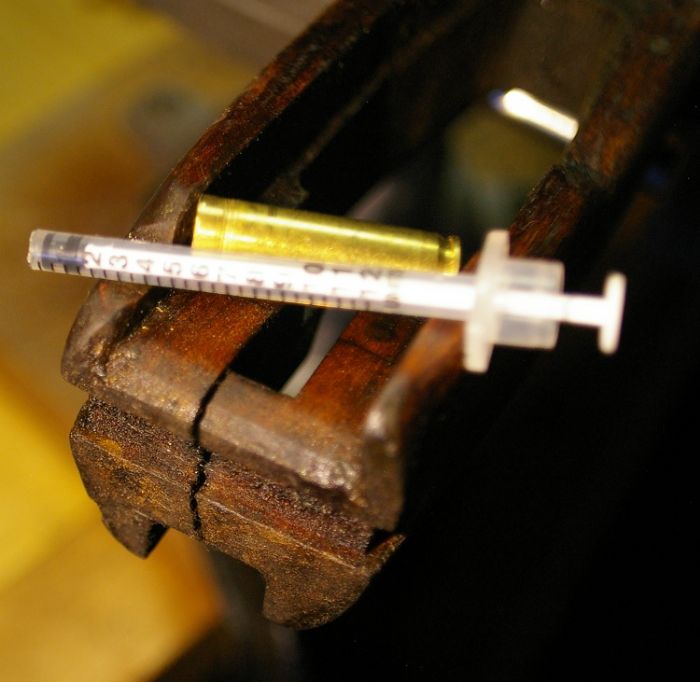
Slightly spread open the crack. Used a shortened .223 case to hold the crack
open. b.
Clean it with alcohol. Let it dry. Cleaned it with ‘simple green’ and a very
thin brush. Let dry. c.
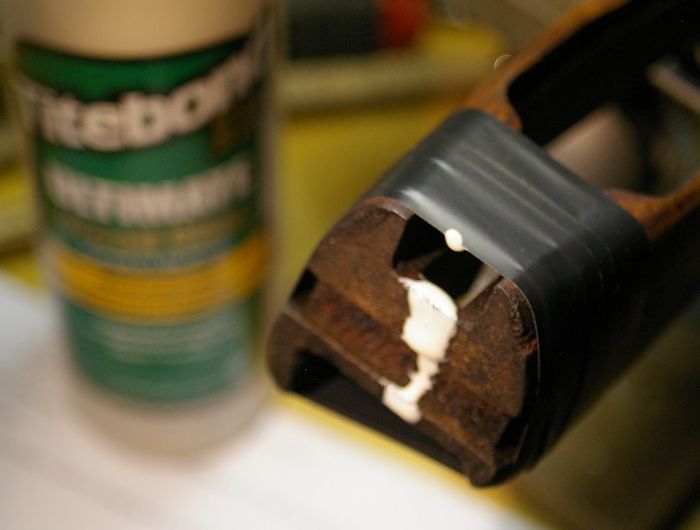
Drizzle the glue into the crack.
d.
Clamp the stock (using electrical tape) until dried.
4. Measure the diameter of
the brass pin. a.
Use a slightly larger diameter (3mm) 304 stainless steel rod. I will replace the original
brass pin (.078”=2mm) with the 304 stainless steel rod (.117”=3mm). It should
provide additional strength. 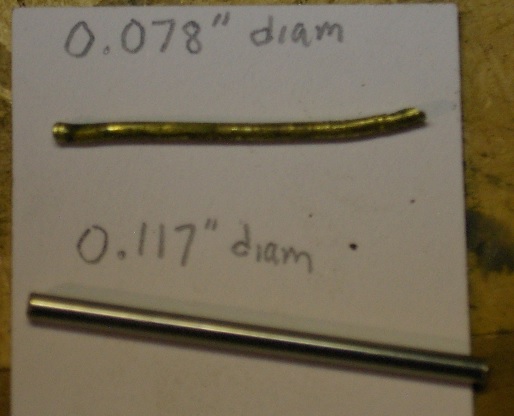 b. Drill open the wood hole
to fit the steel rod. Also provides new wood for the epoxy. 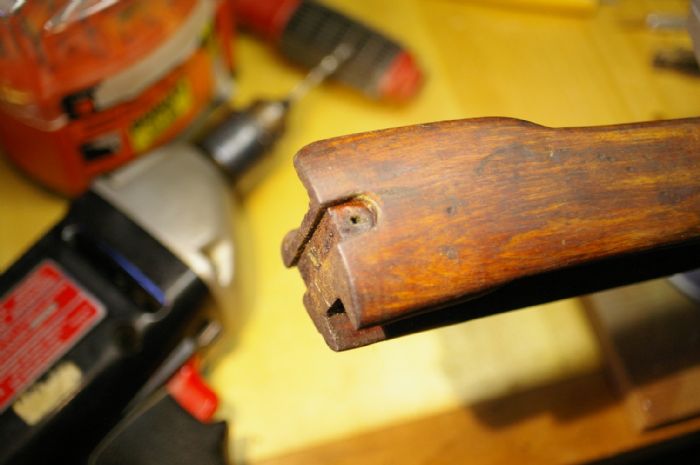 When this dried I drilled open the hole to accept the new 3mm diameter
steel rod. This allowed the crack to open up again. I noticed that the dried
titebond that overflowed and dried could be easily picked off with an xacto
blade. This made me suspicious of the strength of this repair. I started over again but used JB Weld instead. This time I epoxied the
crack, strap and steel rod all at once.  d. Measure the length of
the steel rod to fit flush with the outsides of the strap. e.
JB weld this rod and strap into place using a clamp. f.
Let it dry. 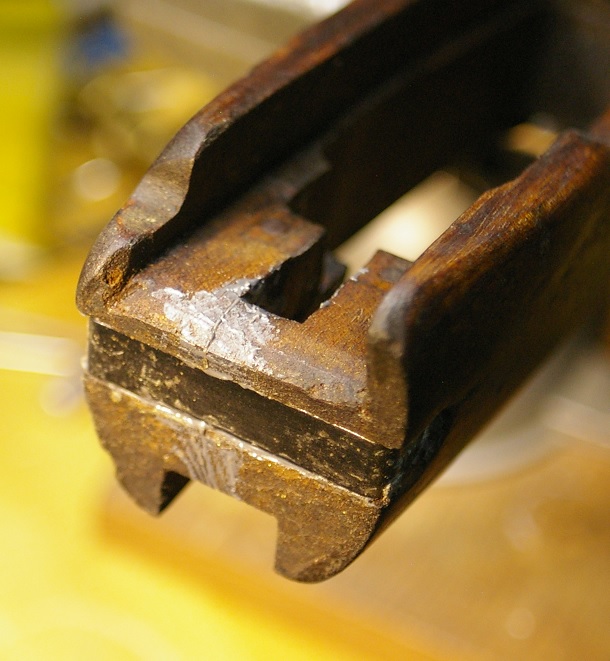 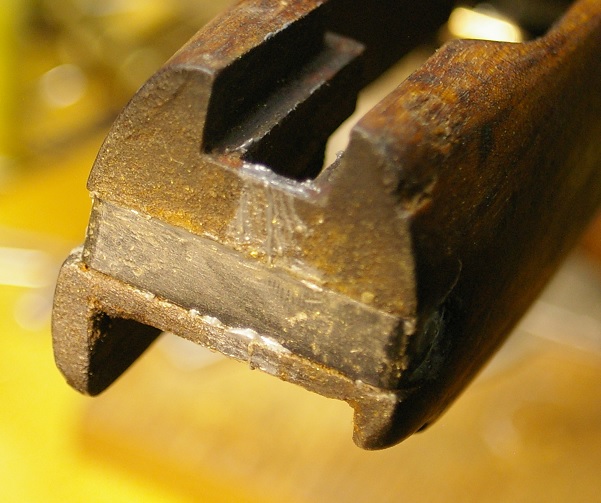 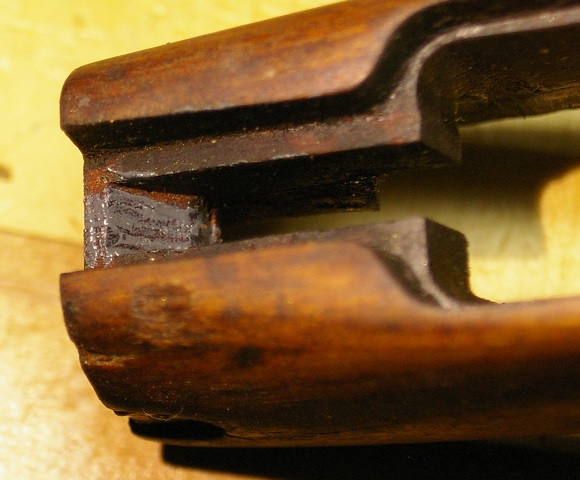 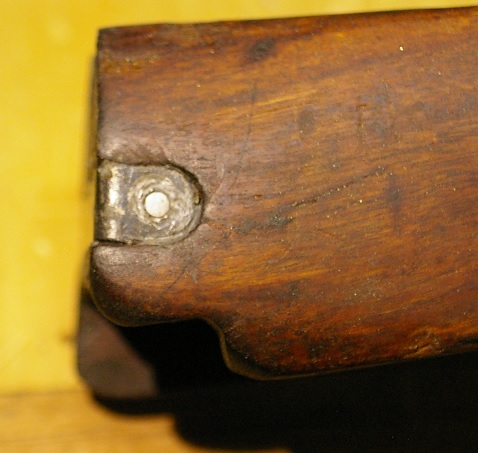 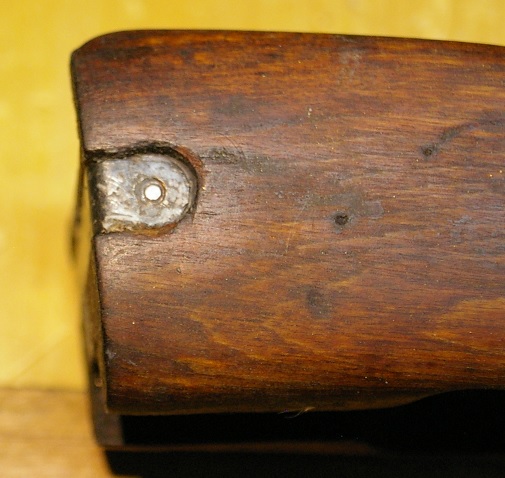 5. Peen a dome over the
brass pin at the dremeled end. Cut off the ends of the pin so only the domed ends
remain. a. epoxy
these in place to preserve the original look. I decided to delete #5. The repair is complete. I should be able to fire this rifle now. |
Posted By: Doco Overboard
Date Posted: January 04 2024 at 3:37am
|
There you go, now you have it. That brass rod, or nail as I call it, is not very much is it? They're pretty soft and not very strong to begin with. When I glue things together, sometimes Ill pour boiling hot water over the area I want the glue to bond dependent on the conditions. Itll wash all the oils out but ample time to dry of course is important before using the glue. It probably didn't hold as well becuase of oil contamination and not being held with a better means of clamping. But no matter, looks like you got it just the same and the rod will give some additional tension.
|
Posted By: micrometer
Date Posted: January 04 2024 at 9:20am
My hats off to all those who pointed me in the right direction for this repair. The boiling water would have been a good idea. I suspect that cosmoline was used while the crack existed and impregnated the area and allowed the titebound to not bind. I did use mineral spirits to clean the crack before I switched to JB Weld. The original brass nail is quite weak as witnessed by how much it deformed upon removal.
|
Posted By: Shamu
Date Posted: January 04 2024 at 10:16am
|
I like the idea of heat, but would personally go with the old "Hair dryer blowing into a big cardboard tube or box" trick, Chief!  I kind of invented the rick trying to extract all the funky black & brown stuff out of my '14 BSA SMLE the one I call "The La Brea Tar Pits special"  ------------- Don't shoot till you see the whites of their thighs. (Unofficial motto of the Royal Air Force) |